
This week, I received some new “toys” in the mail. One, is the book Artisan Bread in Five Minutes a Day and the other: two large plastic tubs to start bread in. Embarking on a bread-baking expedition is a highly impractical thing to do in the heat of summer, since I can hardly bear to turn on the oven, but so far that hasn’t thwarted me from trying!
Let me be frank and tell you that bread baking is not something I’m an expert in. I am a total novice. Fresh-baked bread is just not something I grew up with. My mother has somewhat of an odd dough-phobia and the closest thing we ever had to fresh bread growing up was Bisquick Drop Biscuits! So, I’m starting on this path quite late in life and it’s already proving to be a bit of an obsession! This book basically shows you how to make a large batch of no-knead dough (hmm, this might be right up my mother’s alley) that can be stored in the refrigerator for up to two weeks. When you are ready to bake the bread, you simply scoop out a portion, allow it to rest for a period of time and then bake it for thirty minutes. It’s practically fool-proof! The “boule” pictured above is the “master recipe”, which I’ll share with you! Take a look at the author’s website, artisanbreadinfive.com, as they have a lot of different recipes and tips there also.
What you’ll need:
A large container with a lid for storage. I used this Cambro Container.
3 cups lukewarm water*
1 1/2 tablespoon active yeast
1 1/2 tablespoon kosher salt
6 1/2 cups unbleached all-purpose flour
cornmeal
pizza peel
baking stone
*To make lukewarm water, I used one cup of very hot water to two cups of cool water. Check with an instant-read thermometer and make sure the temperature is right around 100 degrees.
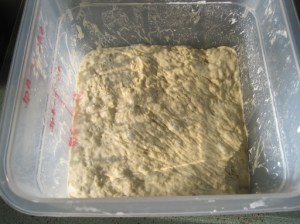
Mix the water, yeast and salt in the container, then mix in the flour. It’s easiest to use wet hands to mix, but do not knead the flour, just make sure it’s evenly moist and that there are no dry lumps. Place the lid on the container, but do not seal it. Now, allow the mixture to rise on the counter for two hours. In that period of time, the dough will double in size. You can bake a batch at this point, but the dough is easier to work with after refrigeration. After the dough has risen, place the container in the refrigerator overnight or for at least 3 hours. This is what my dough looked like yesterday, after having baked two loaves from it.
When you are ready to bake, pull out a hunk about the size of a grapefruit and cut it off with a serrated knife. It will look like this.

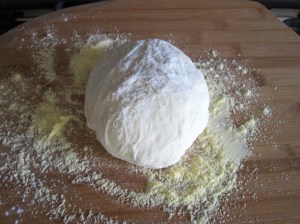
While holding it in your hand, sprinkle it with flour.

Now, here comes the fun part. To shape this oddly-shaped hunk of dough into a ball, you quickly pull each side down toward the palm of your hand and tuck it under. This process should take about thirty seconds and you don’t want to handle it much more than that. Place the ball of dough onto a pizza peel that has been sprinkled with corn meal and allow it to rest. The book instructs to rest it for 40 minutes; however, I have found that a longer rest period makes for a lighter texture, so I rested this loaf for an hour and a half while I went to an appointment.
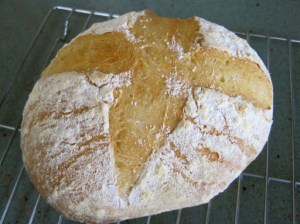
About 20 minutes before you’re ready to bake, place a pizza stone on the middle rack of your oven and preheat your oven to 450 degrees. Also, place an empty broiler pan on the bottom rack of the oven. When the dough has finished resting, sprinkle it with a little more flour and using a sharp, serrated knife, slash the dough. I used an “X” slash on this loaf.

Now, slide the dough onto the preheated baking stone using a forward jerking motion with your wrist. Immediately pour one cup of water into the broiler pan and shut the oven door, trapping the steam inside. This will create that crunchy crust.
After baking for 30 minutes, remove from the oven and place on a cooling rack. The hardest part is allowing the loaf to completely cool before cutting into it!
 |
| The waiting is the hardest part! |
 |
| Yummy! |
This bread truly takes only 5 minutes of hands-on preparation time! Thursday morning I made a loaf and brought it to work. I woke up at my normal time, shaped the loaf and let it rest as I went on my morning walk. I got back home, preheated the oven (because for some reason, my “delay cook” setting didn’t work) and had a baked loaf in the time it took to get showered and dressed! Genius!
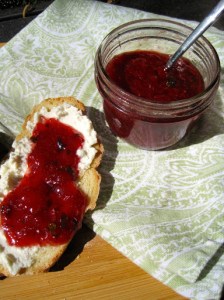
I also made a batch of strawberry-basil jam to go with the delicious bread! This was my first time making jam and what’s funny about doing things on a whim is that if you don’t know that something is supposed to be hard, it probably won’t be! I read an article in the New York Times after I had made the jam that strawberry jam can be difficult to gel. Don’t believe it! It was incredibly easy! I thought about adding the basil at the last minute, as I was looking out the window at this pot of lovelies:

It turned out to be a fortuitous combination–the basil balanced the sweetness of the strawberries so nicely.
I used:
2 16-ounce packages of strawberries
Juice from 1/2 lemon
1 3/4 cup sugar
1 1/2 tablespoon fresh chopped basil (optional)
Hull and quarter the strawberries and place in a saucepan with the lemon juice and the sugar. Cook on medium high heat until it begins to boil, then add the basil. When it boils, turn the heat down just a little and using a thermometer–either an instant-read thermometer or a digital thermometer, cook until the temperature reaches 220 degrees. The temperature will hover around 210 degrees for what seems like forever, but then it will suddenly surpass that point, so keep an eye on it. Now, this is a neat little trick: while the mixture is cooking, place a saucer in the freezer. After your mixture reaches 220 degrees, pour a small amount onto the cold saucer. After two minutes, look at the little dollop. If it’s runny, then it needs to cook a little more, if it is firm, then you’re done!
Pour the jam into sterilized mason jars and either process them to make them shelf-stable, or put them in the refrigerator and use them within one week. I consulted this great canning blog, Food in Jars, for processing methods and tips. Basically, I filled sterilized 1/2 pint canning jars and cleaned the tops and the sides thoroughly before applying the lids tightly. Place the jars in a pot of water and boil for 10 minutes. Remove the jars and place on a kitchen towel on the counter and allow them to cool. Once they have cooled, push the top of the lid with your finger. If it is solid and doesn’t pop, they have successfully sealed. If not, you can either reprocess them, or simply put them in the refrigerator and use within one week. Makes 1 1/2 pints.
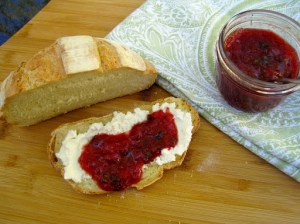 |
| Jam and Ricotta Cheese on Toast |

