
Yesterday was Mother’s Day and we celebrated by having both of our mothers to our home for a barbecue. I did a lot of cooking. I mean, a LOT. I smoked a seven and a half pound pork shoulder, made some delicious pickled onions to go with it, barbecued chicken, baked beans and to top it off, some soft fluffy brioche buns to hold that delicious pork! I was exhausted when it was all over, but it was fun and rewarding to honor our moms with a meal made with love that they didn’t have to cook themselves!
The first time I ever made North Carolina Style pulled pork sandwiches was the year that the New Orleans Saints won the Superbowl. I remember this because that’s the Man of The House’s favorite team and that was a very festive football season! We had planned a big Superbowl party and I decided to try my hand at smoking a pork shoulder. We were living in a different house at the time, with a very tiny yard and we had a very small charcoal barbecue grill. It was cold and raining that day, and I spent the day running in and out of the house in a raincoat and umbrella to stoke the coals and add more hickory chips. It was nearly impossible to keep the temperature in the right zone because it was so cold and wet, but to this day, that was the best smoked pork I have ever had!
These days we have a larger yard and I have a big-girl gas barbecue grill, which I love, but truthfully, I long to have that deep smoked flavor that came from that baby-sized grill. I may have to invest in a dedicated smoker one of these days, but until then, smoking on the grill is a good alternative. This recipe is found in the book “The Barbecue Bible” by Steven Raichlen.
This kind of barbecue takes some time. In fact, this last pork roast smoked for 12 hours before I took it inside. I have heard from barbecue enthusiasts that most of the smoky flavor is imparted in the first three hours, so, if that is true and you wanted to save time by speeding things up, you could bring the roast inside and finish it in a dutch oven with a little liquid in a 300 degree oven.
First I made a spice rub:
1 tablespoon paprika
2 teaspoons light brown sugar
1.5 teaspoons smoked paprika
.5 teaspoon celery salt
.5 teaspoon garlic salt
.5 teaspoon dry mustard
.5 teaspoon ground black pepper
.5 teaspoon onion powder
.25 teaspoon salt
Rub this mixture onto a 5-6 pound pork shoulder roast or “Boston Butt” as it is also called. Wrap it tightly in plastic wrap and place in refrigerator overnight. If your roast is a little “loose” truss it with twine.
You’ll also need about 6 cups of hickory chips. Soak these overnight as well, so that you don’t forget to soak them in the morning. They will need to soak for about an hour.

The next day as you prepare the grill, fill a smoker box with the soaked chips. If you don’t have a smoker box, you can wrap the chips in a foil packet and poke holes in it. Easy and inexpensive alternative!
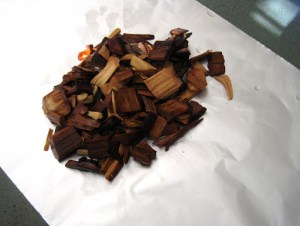 |
| Wood chips on foil |
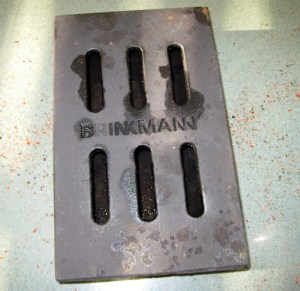 |
| Cast iron smoker box |
Now, set up your grill for indirect grilling. This means that you won’t cook the meat directly above the flames (or coals if using a charcoal grill). Here’s the setup with my grill:
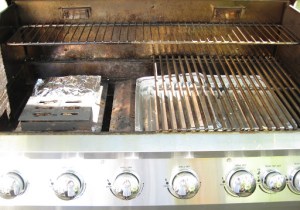
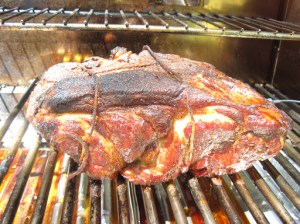
As you can see, on the left side of the grill, I’ve removed the grill grates and placed a smoker box and a foil packet of wood chips directly on top of the burner shields. On the right side, I have placed two disposable foil pans underneath the grates in order to catch the drippings. Light the burners underneath the smoker box (or foil packets) and allow to preheat to 300 degrees. Oil the grates and then place the pork roast fat side up on the unheated side of the grill. Place a meat thermometer in the roast and if it’s digital, set the alarm to 195 degrees.
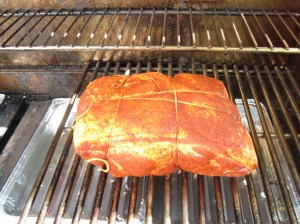 |
| Place roast fat side up on the grill |
You will need to periodically replace the wood chips as they burn out, so it’s a good idea to pre-make several foil packets if you’re using them. Place the spent wood chips into a metal container until they burn out completely.
 |
| After about six hours |
The odd thing that happens with the roast is that it hits a temperature plateau around 161 degrees and it just sits there, not budging. Then after a while, it goes over the hurdle and finally makes its way to 195 degrees, which is the temperature that makes “pulling” possible. After it reaches 195 degrees, bring the roast inside, place it in a roasting pan and allow it rest. After it has cooled down, start pulling the meat apart, separating and discarding any skin and fat.
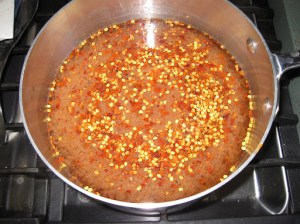 I know that different regions in the country have their favorite barbecue sauce, but I really love this vinegar sauce for the pulled pork and I also used this same sauce for the barbecued chicken.
Vinegar Sauce:
2 cups apple cider vinegar
1/2 cup plus 2 tablespoons ketchup
1/4 cup packed brown sugar
5 teaspoons salt
4 teaspoons red pepper flakes
1 teaspoon ground black pepper
1 teaspoon ground white pepper
1 1/3 cup water
Combine all of these ingredients in a saucepan and reduce it by about 25 percent. Pour half of the sauce into the meat and reserve the rest for people to pour onto their pulled pork, if desired. The red pepper flakes give it a nice, spicy kick!
Now for those buns! I will begin by telling you that I am a novice baker. In fact, it has only been this year that I became brave enough to attempt baking bread. Now that I’ve made a couple of different bread recipes, I’m becoming a little more confident and I really enjoy it! Plus, you can’t beat the taste and the scent of freshly baked bread.

I don’t have a stand mixer, but I learned over the weekend that I can make bread dough right in my Cuisinart food processor. I had to make some adaptations to the recipe to account for the speed and increased heat of the food processor, but the results were exactly the same as the first time I made them using a stand mixer.
The original source of this recipe came from the New York Times, but I came upon the recipe by way of one of my favorite food blogs, Alexandra’s Kitchen. I have to give Alexandra the credit for her virtual hand-holding through my first time making these buns! Here is a link to Alexandra’s blog and the Light Brioche Buns recipe. I will give you my adaptations for using a food processor:
3 tablespoons warm milk
2 teaspoons active dry yeast
2 1/2 tablespoons sugar
2 large eggs
3 cups bread flour
1/3 cup all purpose flour
1 1/2 teaspoons salt
2 1/2 teaspoons unsalted butter, softened
If using a food processor, in a glass measuring cup, combine 1/2 cup warm water, the milk, yeast and sugar. Let stand until foamy (about 5 minutes). Beat one egg and set aside. Set aside 1/2 cup cold water.
Place the dough blade in the food processor. In the bowl of the food processor, add the flours, the salt and the softened butter. On the dough setting, pulse until combined. With the machine running on the dough setting, pour the yeast mixture and the egg into the small feed tube as quickly as the flour can absorb it, then add the 1/2 cup of cold water. When the dough cleans the sides of the bowl and forms a ball, continue running the machine on the dough setting for exactly 45 seconds to knead the dough. It’s very important not to over-knead the dough as the friction from the machine makes the dough very warm, which can kill the yeast. This is also the reason for adding 1/2 cup cold water to the dough–it brings down the temperature of the dough. Remove the dough from the food processor and shape into a ball on an un-floured countertop. Place the dough ball in a bowl and loosely cover with a kitchen towel and place in a warm spot for 1 to 2 hours until it has doubled in size.
Line a baking sheet with parchment paper. Divide the dough into 10 parts and shape the dough into balls and place 2-3 inches apart on the baking sheet. Cover loosely with a kitchen towel and allow them to rise in a warm place for 1 to 2 hours.
 |
| Still haven’t gotten the hang of making perfect dough balls! |
Set a large, shallow pan of water on the oven floor and preheat the oven to 400 degrees. Beat the remaining egg with 1 tablespoon of water and brush the tops of the buns. You can also sprinkle some sesame seeds on top. Bake for 12-15 minutes turning the pan halfway through. Transfer to a rack to cool completely.

