Latest Posts

This Orderly Conduct: Reorganizing my Closet, plus A Stellar Grain Bowl

A Stellar Grain Bowl - Salty Sweet Life

I recently came to the realization that my house is completely out of order. It all started a couple of weeks ago when I completely forgot about a pair of tickets to see Ira Glass performing at the Smith Center. Those tickets weren’t cheap and I’d been looking forward to the show for months. The day of the show came and I spent the day baking cakes and making bolognese, totally oblivious to the date. Ten minutes before the show was to start, I found myself standing in the kitchen, dressed in flour-dusted sweats, staring in shock at the reminder on my phone. I have never completely forgotten an event like that! I felt like I was going to be sick.

The next clue came when I found a long-forgotten medical bill under a pile of papers on my desk that I had set aside to investigate. But the straw that broke the horses’s back, was the Thing I Found in the Pantry. It was an unidentifiable mass in the bottom of the box where I keep the potatoes and onions. It had been in there quietly festering for Lord only knows how long. That’s when I realized that my house, which looks pretty tidy on the surface, was harboring a dark secret–lots and lots of clutter. I looked around and saw clutter cleverly tucked away behind closed closet doors and cabinets; clutter sitting in a pile on the desk; clutter in boxes in the pantry; shelves full to overflowing. How on earth did we end up with all this stuff? All that clutter was piling up in my brain, manifesting as forgotten tickets, late bills and scary blobs in the pantry.  A friend of mine used to say when you learn a lesson that costs some hard-earned money, that you “bought yourself some sense”. Well, with the cost of those tickets, I bought myself some sense and now it’s time to tidy up.

I am usually moved to reorganize in early January, right after the New Year, but I really didn’t have a spare moment between the holidays and launching full speed into planning our wedding. Last year I did a massive project to reorganize my disaster of a pantry so it’s kind of depressing that it is already out of hand a year later. It’s also frustrating to find myself doing the same reorganizing projects year after year, so what I was really looking for was a way to clean up this mess up once and for all. Fortunately, I stumbled across this perfectly inspirational (and aspirational) book, The Life Changing Magic of Tidying Up by Japanese organizing consultant, Marie Kondo. Have you heard of it? I was so intrigued by the author’s claim that I could tidy up my space once and never have to do it again, that I bought the book immediately and read it in one afternoon!

The Life Changing Magic of Tidying Up, Marie Kondo

The Life Changing Magic of Tidying Up, Marie Kondo


The central premise of this small and easy to read book, is to surround yourself with only the things that “spark joy” when you hold it in your hands. The author’s “KonMari” method forces you to come to terms with each item that you own and assess how you feel about each piece, starting first with clothing, then moving in order onto books, papers, miscellany and lastly, things with sentimental value. Last weekend, I tackled my clothing. I took every piece of my clothing from all of the different parts of the house and piled them in the center of my bedroom and the sheer volume of my clothing took my breath away! I don’t think of myself as someone who has an extensive wardrobe and I am famous for staring into the abyss of my closet saying “I don’t have a thing to wear!” but this enormous, teetering pile of clothing was staggering.

This is a terrible photo, but I wanted you to see what I started with.

This is a terrible photo, but I wanted you to see what I started with.

Determined to arrive at the calm, Zen spaces described in the book, I did my best to follow Marie Kondo’s method of picking up each piece, and asking myself if that piece of clothing “sparked joy”. Through this process, I learned that I had a closet full of clothes that didn’t spark joy–clothes I didn’t love, but purchased just because they were on clearance; clothing received as gifts that didn’t suit me, but I felt too guilty to discard.  The book allowed me to let go of the guilt associated with discarding these items by helping me to acknowledge the item’s contribution to my life and to let it go with gratitude. I admit, the whole time I worried that I wouldn’t have anything left to wear. Seven bags of donated items later, I now have a small core wardrobe of my favorite things. I cheated a little bit. I still have one or two items that I haven’t parted with that don’t exactly bring me joy (I’m talking to you, pilly blue sweater!) but that I’ve convinced myself I still need. I expect I’ll get rid of those final few items in the near future as soon as I find something joy-inducing to replace them with!

What made the biggest impact on me through this process was the author’s method for folding clothing to maximize drawer space. Each piece is folded into a simple rectangle and aligned in the drawer on edge like a filing system. Where has this method been all my life?  I was able to save so much space in my dresser that I freed up an entire drawer for The Husband. I love this method so much, I’ve started folding everything in the house like this, including my kitchen linens!

clothing

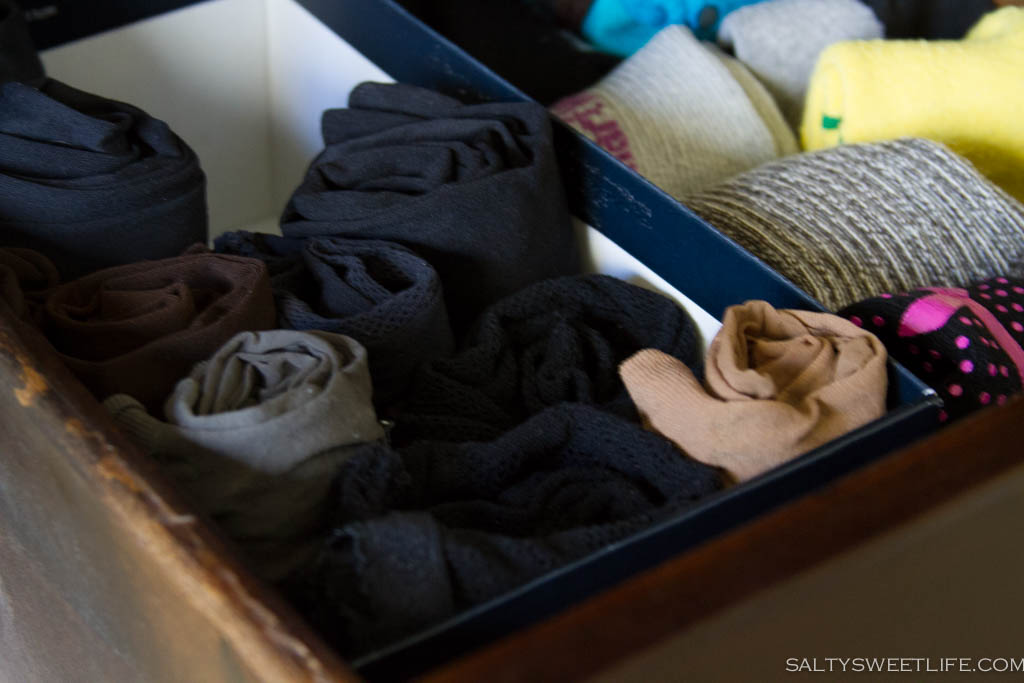
The author has a very unique perspective when it comes to socks and stockings. She emphatically warns against balling your socks (the way I’ve arranged my socks until now):

The socks and stockings stored in your drawer are essentially on holiday. They take a brutal beating in their daily work, trapped between your foot and your shoe, enduring pressure and friction to protect your precious feet. The time they spend in your drawer is their only chance to rest. But if they are folded over, balled up or tied, they are always in a state of tension.

In short, if you ball up your socks or tie up your stockings, they wear out faster. The author’s anthropomorphism of these ordinary objects resonated with me as I imagined the poor socks stretched and tense in the drawer. I unbundled all the socks and carefully refolded them. I rolled my stockings and set them on end. They are now resting happily in the drawer.

clothing-2

clothing-4

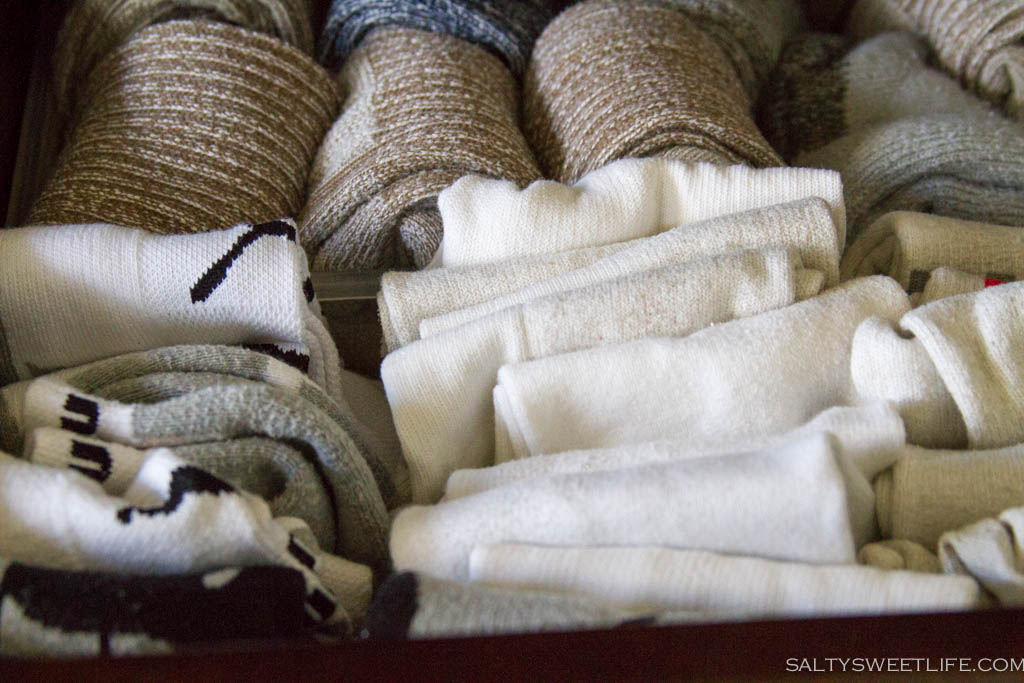
This is The Husband’s sock drawer. It’s chock-full because he hasn’t had a chance to declutter yet, but you can see how many socks can fit in the drawer now.

I highly recommend the book. The message is so incredibly simple, yet it has forced me to come to terms with my tendency to hold onto items in my home that don’t fill me with joy. Yes, it’s hard to get rid of large amounts of “stuff” but if I only have to do this once and the end result is a clean, organized space like the ones shown in the video, then sign me up!

It wasn’t just my brain that was feeling the effects of so much clutter, my gut was also suffering. I’ve had digestive problems over the years and most of the time I can keep it in check, but lately, my stomach has been on the warpath. Between holiday food, wedding food, football game snack food, my gut has been telling me that I haven’t been eating well at all. There were even days where I had to think hard to remember if I’d eaten any vegetables that day. So, along with tidying up my home I’m tidying up my diet as well.

A Stellar Grain Bowl - Salty Sweet LifeI was really inspired by an article in the February issue of Bon Appetit magazine describing how to make a stellar grain bowl and they have become our go-to meal lately. The method is so incredibly simple that you don’t really need a recipe at all.

A Stellar Grain Bowl - Salty Sweet Life

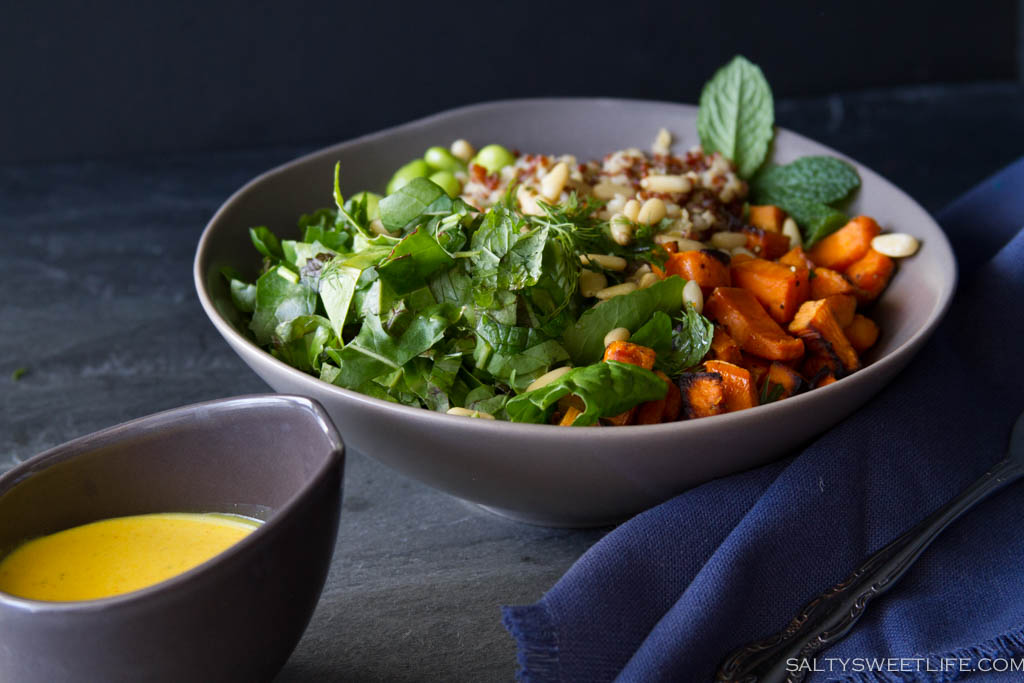
This isn’t so much a recipe as a blueprint for making your own grain bowl and the possibilities are endless. Start with a base of whole grains. I used a combination of freekeh and quinoa for this one. Add some leafy green vegetables. We have some collard and mustard greens in our garden that are coming to the end of their life cycle, so I sliced them thinly and added a splash of lemon juice to tenderize them along with some spinach, arugula and beet greens from our garden as well. You can also add a splash of apple cider vinegar for tenderizing hardier greens like collards or kale.

A Stellar Grain Bowl - Salty Sweet Life

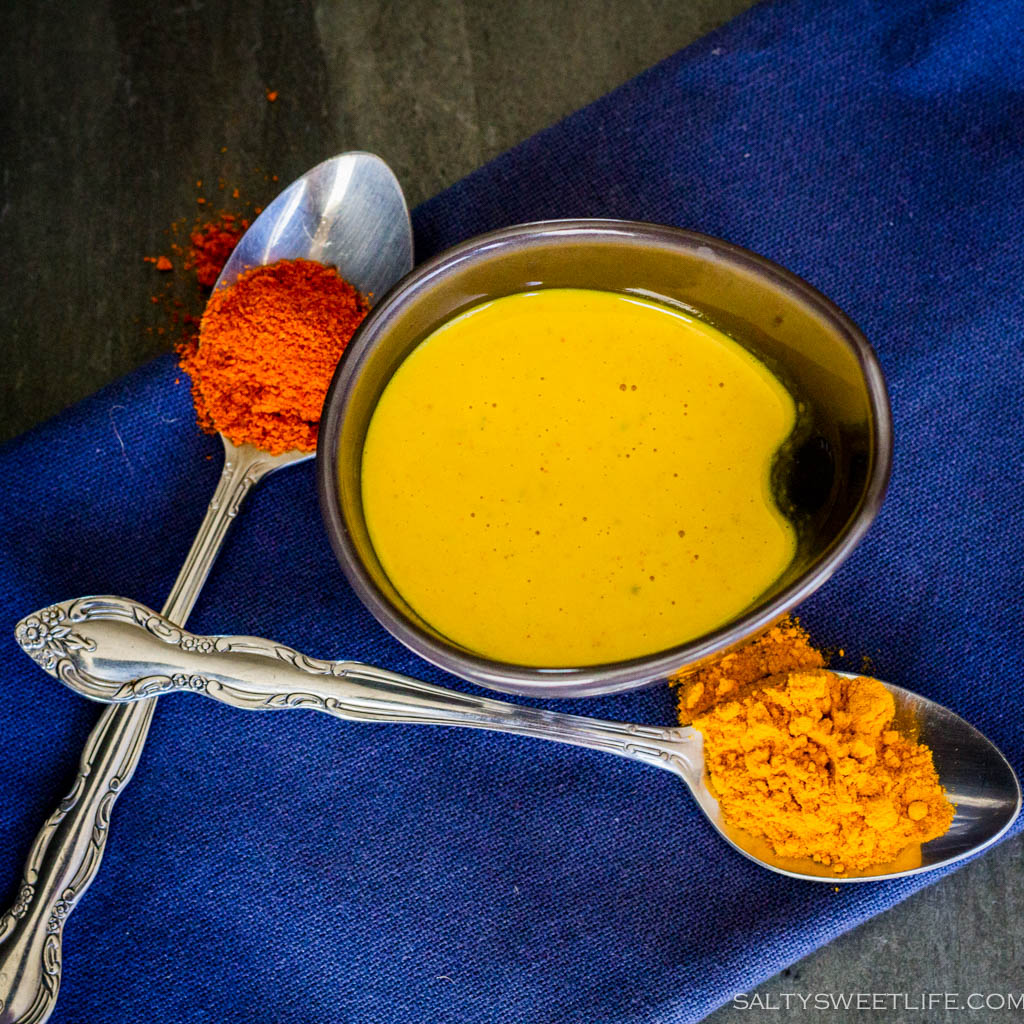
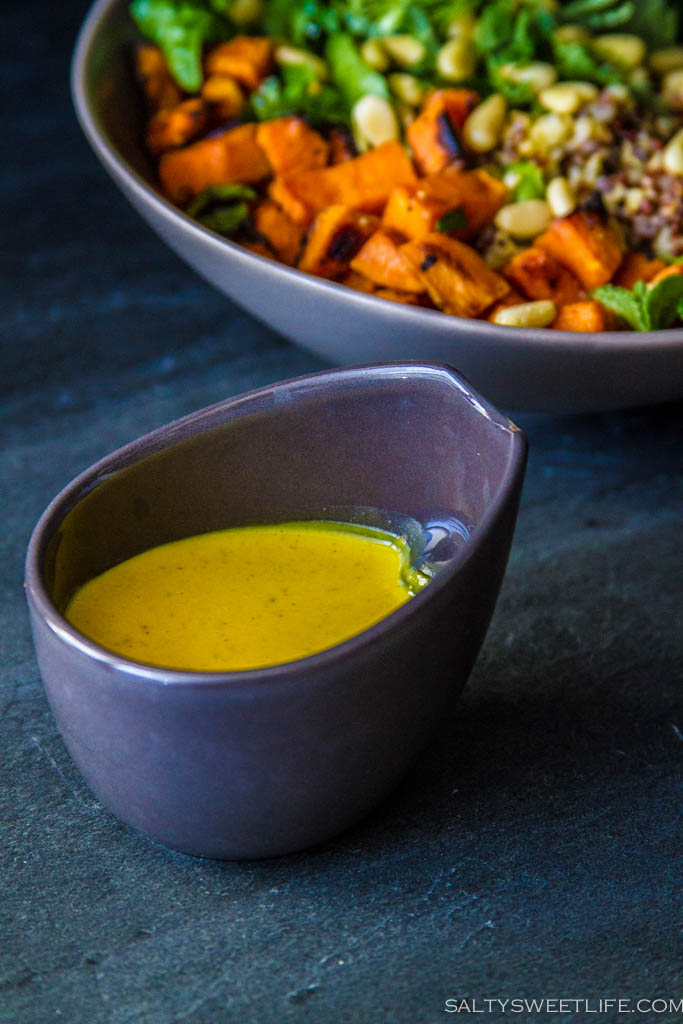
Add roasted root vegetables for sweetness and color. For our grain bowl, I roasted some cubed sweet potato in coconut oil. Toss in something crunchy. Toasted nuts, like pine nuts or walnuts are a delicious addition. Also consider adding seeds, like fennel or sesame seeds. Top it all off with a zippy dressing. This bright and sunny tahini dressing is almost exactly the same as the tahini sauce I shared last week, but with the addition of turmeric and cayenne pepper which gives it a perfect dose of heat. What I ended with was a grain bowl that definitely “sparked joy” in my stomach–bright and colorful, with a little crunch. My body thanked me for giving it something healthy and filling.

A Stellar Grain Bowl - Salty Sweet Life

A Stellar Grain Bowl

  • Servings: 4
  • Difficulty: easy
  • Print

Inspired by Bon Appetit Magazine, February 2015 issue

  • One cup of whole grains of your choice, cooked according to the package instructions.
  • 2 cups of assorted fresh greens: beet greens, spinach, collard greens, mustard greens, cabbage, arugula, chopped thinly
  • 2 teaspoons of apple cider vinegar or lemon juice
  • Handful of tender herbs, such as cilantro, mint, dill, parsley and fennel fronds
  • 3/4 cup frozen shelled edamame
  • 1/4 cup chopped and toasted nuts of your choice, I used pine nuts
  • 1/2 teaspoon seeds
  • 1 large sweet potato, cubed
  • Flake sea salt

For the Tahini Dressing:

  • 1/4 cup Tahini
  • 3 tablespoons fresh lemon juice
  • 1 teaspoon maple syrup
  • 1/2 teaspoon ground turmeric
  • 1/4 teaspoon ground cayenne pepper
  • Fresh ground black pepper
  • Salt
  1. Cook 1 cup of whole grains in 2 1/2 cups of water or broth along with a pinch of salt.
  2. While the grains are cooking, prepare the greens by slicing them thinly and placing them in a medium bowl. Toss with the apple cider vinegar or lemon juice and sprinkle with a pinch of the sea salt. Set the greens aside to tenderize.
  3. Season the sweet potato with salt, pepper and a dash of cumin, if desired. Roast the sweet potato in a tablespoon of coconut oil or olive oil in a 425 degree oven until tender.
  4. When the grains are very nearly done, add the edamame to the cooking pot and cover. Remove from the heat.
  5. Toast the nuts and seeds (if using) in a dry frying pan for just a few moments until fragrant.
  6. Whisk the ingredients for the dressing in a small bowl. The dressing should be smooth and a little runnier than honey.
  7. Assemble the bowls starting with a serving of the grains and edamame. Top with the greens, the sweet potato and the nuts and seeds. Finish with a small handful of the tender herbs. Drizzle the dressing over the top and enjoy!

I have a long way to go with this decluttering project and my next project will be tackling our bookshelves, which are currently filled to overflowing. I’ll keep you updated on my progress!


A Stellar Grain Bowl - Salty Sweet Life


A Stellar Grain Bowl - Salty Sweet Life

Elk Kofta B’siniyah with Tahini Sauce


Elk Kofta B'siniyah Adapted from Jerusalem - Salty Sweet Life

If you’ve read my About page, you might remember that I told a little story about eating squirrel. I was born in North Carolina, and though I wouldn’t call my hometown “the country”, my grandmother’s house, where I spent most of my time, butted up against a woodsy area that I don’t think was owned by anyone. It was just “the woods” and it was where I would pick blackberries in the summer and where my teenaged uncle would hunt. On Saturdays he would take his BB gun and venture out to the woods and come back a few hours later with a rabbit or two. My grandmother would clean his catch and cook them up, usually in a simple fricassee. In fact, she actually called it “fricassee” (the first food term I learned) and it must have been her signature dish because it’s the only thing I ever remember her making. The day my uncle brought home the squirrel was forever seared in my memory because I saw it in my grandmother’s 1970s avocado-green sink, skinned and looking very much like a pink rat. I was terrified. My grandmother assured me that it was squirrel (which didn’t make me feel any better) and proceeded to fricassee that squirrel just as she had the rabbits. To this day I remember its tiny bones and how difficult it was to eat, dripping with gravy and commingled with rice. My child-memory leads me to believe that the squirrel’s teeth and claws were in the pot as well but that could have been my imagination (at least that’s what I’m going to tell myself). That was one of the last times I had access to freshly hunted meat, since modern living means easy access to an abundance of familiar proteins found vaccuum-sealed in the grocery store: beef, pork, chicken and the occasional lamb chop. That is, until I received a text message from a good friend one day last week.

It was such a random question: “Do you like elk meat?” that I immediately laughed before I responded, thinking a punch-line was imminent. Instead, came the offer of fresh elk meat, recently hunted in neighboring Utah. I had never tasted elk before, but the thought of fresh game was so exciting that I immediately began researching all the ways to cook it. Within hours, I had nearly two pounds of fresh ground elk in my possession. I brought it home, and spent the next few days pondering what in the world I was going to do with it.

My internet research told me that elk meat is very low in fat and so care must be taken to cook it quickly without drying it out. I took the meat from its package and sniffed it. The only way I can describe it is that it smelled clean and pure. The color was a deep, dark red with only a few flecks of white fat. I ran it through my fingers and found that it lacked the oiliness of ground beef, which also meant that it didn’t stick together very well. I made a tiny patty, sprinkled it with a little salt and cooked it quickly in a small cast iron skillet. The flavor was purely meaty, but it was distinctly not “beefy”. The only thing I could compare it to was venison, which I’d only eaten once before.

After tasting it, I decided to make a recipe from my Jerusalem cookbook called Kofta B’siniyah. Kofta are meatballs often made with lamb or beef or a combination of the two, mixed with onion, garlic and spices and shaped into “torpedo-like fingers”. Elk seemed like a perfect vehicle for the bold spices–cinnamon, allspice, nutmeg.

51oXmEwmo6L._SY344_BO1,204,203,200_

Since the meat had already demonstrated that it lacked the sticking power of fattier meats, I made some adjustments. Normally when I make any type of meatball, finely chopped raw onion is added to give the meat flavor and moisture. Since this meat should not be overcooked and I planned to keep it medium-rare in the center, I decided to sauté the onions first, until they were a deep golden brown before adding them to the meat. That way, I was free to cook the meatball quickly and not have the unpleasant bite of raw onion. Sauteéing the onions in olive oil allowed me to add some healthy fat to the meat, hopefully helping it to stick together and also giving it a little more flavor.

Elk Kofta B'siniyah Adapted from Jerusalem - Salty Sweet Life

Shaping the kofta was a little bit difficult due to the fact that the meat was so lean, but a gentle squeeze and some time in the refrigerator helped them to hold their shape. Still, care had to be taken to keep them from falling apart while being cooked.  I seared them, sizzling in hot oil until they had a nice brown crust, which only took about a minute for each side, then let them rest. I served them with a tahini-lemon dressing and drizzled a little more olive oil over the top.

Elk Kofta B'siniyah Adapted from Jerusalem - Salty Sweet Life

I’ve heard people describe game meat as, well, “gamey” but I really don’t have a clear understanding of what that actually means. I’ve also heard people say that lamb is “gamey”, but I just think that lamb tastes like lamb–rich and round. To me, elk just tasted like good, fresh, lean meat. The end result was a tender bite, medium-rare in the center and very moist. If there was any “gaminess” it was obscured by the spices. The Husband wanted to taste more of the meat without the spices and in hindsight I should have saved a plain patty for him to taste as a comparison. All things considered, I’m pretty glad that my earliest food memories involved skinned squirrels and rabbits in the kitchen sink, because I may have missed out on the opportunity to experiment with a protein that was truly unfamiliar, unexpected and delicious!

Elk Kofta B'siniyah Adapted from Jerusalem - Salty Sweet Life

Elk Kofta b'siniyah with Tahini Sauce

  • Servings: makes 8 kofta
  • Difficulty: easy
  • Print

I made these kofta with fresh ground elk meat so I was confident that it was handled and dressed properly by the hunter. Regardless of the type of meat you are using, it’s best to grind it yourself or have the butcher grind it for you. Serve the finished kofta immediately with a drizzle of olive oil or melted butter if desired and in a generous pool of the tahini sauce. I feel like I’ve been making tahini based dressing more and more these days and I really love it. The slightly smoky flavor of the tahini with the brightness of the lemon juice balances the meat quite nicely. 

Recipe inspired by and adapted from Jerusalem, A Cookbook, by Yotam Ottolenghi and Sami Tamimi.

For the Kofta

  • 12 ounces fresh ground elk (you can also use lamb, beef, veal or a combination)
  • 1 small onion, finely chopped
  • 2 cloves garlic, crushed
  • 3 tablespoons toasted pine nuts, coarsely chopped
  • 1/4 cup chopped flat leaf parsley
  • 1 hot red chile, chopped fine (I used a red serrano chile from my garden)
  • 1/2 teaspoon ground cinnamon
  • 1/2 teaspoon ground allspice
  • 1/4 teaspoon grated nutmeg
  • 1/2 teaspoon ground black pepper
  • 1/2 teaspoon kosher salt

Remaining Ingredients:

  • 1/4 cup tahini paste
  • 1/2 lemon, juiced
  • 1 small clove garlic, crushed
  • 1/4 cup water
  • Additional chopped parsley and paprika for garnish
  • olive oil
  • Sunflower oil (I used a Mediterranean blend oil that contains olive, grapeseed and canola oil)
  1. Heat two tablespoons of olive oil in a sauté pan and add the chopped onion. Cook for 15 to 20 minutes, until the onion has completely softened and is the color of maple syrup. Allow the onions to cool a few minutes and add to a mixing bowl with the remainder of the ingredients for the kofta. Use your hands to thoroughly mix the ingredients. Spoon about 1 1/2 tablespoons of the mixture into your hand and shape into a small torpedo. Make sure you squeeze the kofta enough that they hold together well. Place the shaped kofta on a baking sheet and place in the refrigerator for at least 30 minutes.
  2. In a small mixing bowl, whisk the tahini paste, lemon juice, garlic, water and a pinch of salt.  The mixture should be slight runny. If it is too thick, add a little more water until it is pourable consistency.
  3. Heat two tablespoons of sunflower oil or Meditteranean blend in a frying pan over medium hight heat. Add the chilled kofta and sear on each side until golden brown. If using elk, only cook for 1 to 2 minutes on each side. If using lamb or beef, cook for about 6 minutes total. Remove the kofta and place them on a baking sheet. The kofta will be medium rare at this point. If you want to cook them longer, place them in a 425 degree oven and cook for an additional 2 to 4 minutes, being careful not to overcook.
  4. Spoon the tahini sauce around the kofta and sprinkle with additional pine nuts, chopped parsley and paprika. Drizzle with a little olive oil or browned butter if preferred. Serve immediately.

My Tiny Amazing Wedding

cattaniwedding-8

I’ve been to a lot of weddings in my life, but as far as weddings go, this one was the best, because it was ours. It wasn’t held in a big wedding hall or cathedral. There were no bridesmaids or groomsmen. It was just us, in our own backyard, with a couple dozen of our closest friends and family members.

cattaniwedding-12

My best girlfriend had written a tight schedule for me, outlining the tasks I needed to accomplish in the days and hours leading up to The Big Day. Amazingly, I slept soundly through the night and opened my eyes at 7 am, feeling content and refreshed. As I lay there thinking through the day’s schedule, The Husband-to-be, who had been a big ball of prickly stress all week long, rolled over and put his arms around me and whispered “happy nuptial dinner day”. I happily snuggled in for just a few more minutes of cozy shut-eye and realized that no matter what happened the rest of the day, this would be the moment I would remember most. There were plenty of tasks ahead, but we started our morning like any other Saturday, with cups of steaming hot coffee enjoyed over our books. Afterward, I would make The Husband-to-be bacon and eggs, because I didn’t want to get so consumed by tasks that I forgot to make him feel loved. Plus, it’s nearly impossible to have a bad day when you start it with bacon.

cattaniwedding-7

By mid-morning my friend, Victor arrived to decorate. Like any other modern bride-to-be, I had some very Pinterest-worthy aspirations for the decor, but I lacked the skills (and the time) to pull it off.  I handed him a box of canning jars, empty wine bottles I’d collected from friends, a 50 pound bag of sand and a couple of rolls of kraft paper. Like the McGyver of ribbons and tape, he transformed those ordinary objects into the most romantic scene. It is amazing to have friends who are so generous with their time and their talents!

cattaniwedding-16

This centerpiece was made by our dear friends, Adam and Shawn.


The irony did not escape me that while a huge swath of the country was bracing for the Great Blizzard of 2015, we were preparing for a garden wedding, but this is what we call winter in Las Vegas and you’ll find no complaints from me! The slight breeze that threatened to kick up earlier that morning mellowed by the afternoon and temperatures rose to the upper 60s.

cattaniwedding-4

cattaniwedding

cattaniwedding-29

cattaniwedding-5

cattaniwedding-2

In the weeks leading up to the wedding, my girlfriends and I had gotten together and rolled hundreds of tiny meatballs for Italian Wedding Soup, baked four chocolate cakes and made the family bolognese. It was important to me that the menu represented our family and culture and also our relationship, but I also wanted to make sure that I didn’t spend the evening in the kitchen worrying about the food. I chose to make lasagne using the family bolognese recipe and the roasted chicken that the Husband-to-be loves so much. The lasagne was a perfect choice because I was able to prepare it ahead of time. The chicken was more high maintenance than I would have liked and the grill kept flaming up, forcing me to finish it in the oven. Some of the chicken was rather blackened, but if anyone noticed, they didn’t say anything. As usual, I made way too much food–we are still working our way through the leftovers!

cattaniwedding-28

cattaniwedding-13

cattaniwedding-11

Antipasti platters made by my friend Virginia.

cattaniwedding-10

Italian Wedding Soup

Barefoot Contessa, Italian Wedding Soup

cattaniwedding-23

As night began to fall and dinner was served, our little backyard began to glow with candles and firelight. Conversations flowed easy like the wine into our glasses. The stress we had both felt over the past month of planning melted away and we were able to relax and enjoy each other and our guests. I think I was the calmest I’ve ever been at a party we’ve hosted, thanks to the help of so many friends. As we exchanged our vows there under the stars and twinkling lights, I knew there was no place I’d rather be than in my backyard with the love of my life surrounded by so many smiling and happy faces.

cattaniwedding-17

cattaniwedding-22

cattaniwedding-21

cattaniwedding-20

cattaniwedding-19

cattaniwedding-18

cattaniwedding-15

cattaniwedding-27

cattaniwedding-26

The cake ended up being the star of the evening!

cattaniwedding-30

cattaniwedding-31


cattaniwedding-33 cattaniwedding-34

cattaniwedding-35

The photographers both wore Chucks.

The photographers both wore Chucks.

A Special Thank You to Holiday Lighting Dynamics for providing the gorgeous bistro and tree lights. The photography in this post provided by our dear friend, London Mace. Popcorn favors by Popcorn Girl, Las Vegas.

Molly Wizenberg’s “Winning Hearts and Minds Cake”

Molly Wizenberg's "Winning Hearts and Minds Cake" - Salty Sweet Life

This week, I decided to bake a cake. I’m sure I’ve mentioned before that I am not a big dessert lover, but this is a special occasion because next week, The Husband and I are getting married! It probably looks funny that I just said that, but he has been my husband all along.
We have been a couple for nearly a decade, although we’ve known each other for even longer. We met way back in the early 1990’s when both of us were fresh out of college. We bonded over our shared love of books. He wanted to be a writer; I had dreams of working in museums and restoring art. Fast forward 20 years and we’ve been through thick and thin; richer and poorer. Through my weird and terrifying illnesses, he’s been by my side. Through his very stressful job that took him all over the country every week for years, I’ve held down the fort. We’ve been through the fire so often our molecules have fused and we are made stronger for it. He knows me better than I know myself and so, when I told him I’d cater our small backyard wedding, he offered to pay for a therapist!

I’m a little harried right now, as you might imagine. Every day I think of new things that I have forgotten to take care of, but at least for this moment, I have one thing accomplished–I have found The Cake.

Molly Wizenberg's "Winning Hearts and Minds Cake" - Salty Sweet Life

During the holidays, in the quiet moments before we decided to throw a wedding in less than thirty days, I spent some time cozily wrapped in blankets, drinking tea and reading Molly Wizenberg’s (creator of the blog Orangette) A Homemade Life.

A Homemade Life, by Molly Wizenberg

What I loved about this book is that it is essentially a love story built around food and family and I am a sucker for a good love story.  The way Molly knits a recipe into the fabric of her stories is nothing short of amazing. It made me laugh and cry and then it made me want to eat–radishes with butter and salt, bread and chocolate, Dutch Baby pancakes. I finished it in a week and loved it so much that I feel I can’t part with it. I’m going to have to buy it because I just got an email from the library politely asking for its return. At the very end of the book, at the culmination of her own love story, she writes about this cake, that she aptly names “The Winning Hearts and Minds Cake”. She baked this cake for her wedding and promised it would be easy, could be made ahead of time and even frozen. She mentioned the cakes weren’t “beauty queens” but spoke of their ability to inspire obsessive behaviors and cleaned plates; in short, it sounded like exactly the kind of cake that I was searching for.

So far I think I’ve done a fairly decent job of choosing a menu that I can execute, without executing the people I love. But I was worried about the cake, because I’m not a baker and I don’t think I can handle anything right now that isn’t absolutely foolproof. At this moment, I need a cake that even a kid can make.

Since there are no photographs in this book, I wasn’t sure what to expect. I read the instructions multiple times, not fully believing that 5 ingredients: bittersweet chocolate, sugar, eggs, butter and a minuscule amount of flour, could become cake. I worried that the 1990s would call and want its lava cake back. Mostly I worried, because that’s just what comes naturally when you do something crazy and unrecommended, like catering your own wedding dinner.

IMG_1022

My fears and worries were unfounded. The cake puffed around the edges and cracked on top like a brownie just as Molly explained. As it cooled on the counter, it settled into itself and solidified, forming a slight bowl shape–perfect for putting something in…like berries! By the time I cut into it, the center had set and it didn’t ooze like lava cake. Its slightly wonky appearance is part of its charm.

This cake, like our relationship, is as perfect as it should be. Sweet like sugar, rich as chocolate and forged with just enough heat to melt our hearts and win our minds.

Molly Wizenberg's "Winning Hearts and Minds Cake" - Salty Sweet Life

Molly Wizenberg's Winning Hearts and Minds Cake

  • Servings: 6-8
  • Difficulty: easy
  • Print

Lightly adapted from A Homemade Life, by Molly Wizenberg

This cake may not have been born a beauty queen, but she cleans up well. Dressed up with a mound of raspberries and dusted with powdered sugar, it becomes downright fancy. The texture is silky and dense and the flavor is intensely chocolatey. There are no extra ingredients, like vanilla extract or coffee to distract from the fact that this is a decadently Chocolate Cake. My favorite part of the cake are the edges. They tend to flop over a little, which makes them easy to pilfer and shove into my mouth before anyone notices! Since this is such a simple recipe with so few ingredients, I made sure to use the best ingredients I had. I used the good butter; a block of Plugrá I’d been saving for just such an occasion. I also used Ghirardelli 60% cacao bittersweet baking chips.

  • 7 ounces high quality unsalted butter like Plugrá or Kerrygold, cubed
  • 7 ounces bittersweet chocolate, chopped finely, or use baking chips as noted above
  • 1 cup plus 2 tablespoons granulated sugar
  • 5 large eggs
  • 1 tablespoon unbleached all-purpose flour
  • Fresh berries, confectioner’s sugar or whipped cream
  1. Heat the oven to 375 degrees. Cut a piece of parchment paper to fit the bottom of an 8 inch round cake pan. Butter the sides and bottom of the cake pan, then place the piece of parchment in the bottom of the pan and butter the parchment paper.
  2. Place the cubes of butter and the chocolate in a large microwavable bowl. Microwave on high for 30 seconds, stir and repeat in 30 second intervals until the chocolate and butter are melted. Alternatively, if you don’t have a microwave, place the bowl over a pot of simmering water (making sure the bowl doesn’t touch the water) and stir until the chocolate and butter are melted.
  3. Add the sugar and stir until the sugar melts into the batter. Allow the batter to cool for about 5 minutes. Whisk in the eggs, one at a time, making sure they are well mixed before adding the next egg. The mixture should look glossy. Add the tablespoon of flour and mix well.
  4. Pour the batter into the prepared cake pan and set the pan on top of a rimmed baking sheet. Bake for about 20 minutes and check the cake. The middle of the cake will be quite jiggly at that point. Continue baking, checking on it every 2 minutes until the center of the cake barely jiggles. Remove the cake and allow it to cool in the pan on a cooling rack for 15 minutes.

To unmold the cake, I followed Molly’s exact instructions. Place a sheet of foil on top of the cake. Take a dinner plate and place it on top of the foil and quickly flip the pan over. The cake will be upside down. Remove the pan and peel the parchment from the bottom of the cake. Then place the serving plate, or in this case, a cake stand on top of the cake. Placing your index fingers between the plates to avoid squishing the cake, flip them over. The cake is now right side up on the serving plate or cake stand. Remove the foil.

Allow the cake to cool completely, then fill the depression on the top of the cake with berries if you prefer. Sprinkle with confectioner’s sugar and serve with whipped cream. This cake tastes best at room temperature.

Molly Wizenberg's "Winning Hearts and Minds Cake" - Salty Sweet Life

This post is part of the monthly blog event, Our Growing Edge. This event aims to connect food bloggers and inspire us to try new things. This month is hosted by Francesca at Fearless Kitchen

unnamed

Weird Shoes

Before I left on my last trip to Oregon, I stopped into REI for some last minute purchases. We both needed raincoats because living in the desert for 25 years means we don’t own such things. I tried on about a dozen or so raincoats before settling on a bright turquoise number with a detachable hood and a cool little pocket in the lapel specifically made for my mobile phone and earbuds. As I gathered my things to check out, a glimpse of red in the shoe section caught my eye: the holy grail of weird shoes. Blood-red leather Keen Mary Janes, with rainbow-striped cross-straps and toe caps the color of pink limestone. If the fact that they were weird didn’t thrill me enough, the fact they were on clearance pretty much meant those shoes were going home with me that day. I justified the purchase saying I needed a new pair of traveling shoes. Shoes I could easily slip in and out of in the airport security line “like a boss” and signaling to other passengers that I was a Very Seasoned Traveler.

We arrived in Portland on a grey and drizzly morning, with the rain falling in fits and starts and the sun peaking out intermittently from behind the clouds. At the airport I began to have some misgivings about my decision to wear brand new shoes while traveling when they began to rub against a tender spot right above my big toes. I wrote it off as just my imagination, or at worst, the result of my feet swelling during the flight.

Since it was early and we weren’t able to check in to our vacation rental for a few more hours, we found ourselves happily stranded in Southeast Portland with time to kill. So we walked, and walked and walked, while the pain in my feet, by this time bright-hot and throbbing, had escalated to such an acute level I thought I might cry real tears right there in the middle of the sidewalk. And then, a mercy: a bookstore attached to a coffee shop promised sweet relief and we ducked inside. I don’t think I’ve ever been so happy to simply stop walking, grab a book and sit down.

These shoes are not Las Vegas shoes. Las Vegas ladies will wear six-inch stilettos to the grocery store, no joke. But in Portland weird shoes are everywhere! All around me were my weird shoe Kinfolk. Uncomfortable as the shoes were, I wore them like a banner. I even wore them with weird socks. I let my weird shoe flag fly.

IMG_7698

I wore the shoes with socks for weeks until they were pliable enough to not make me weep. It took a couple of months before the scars from the blisters earned on our trip finally faded.

When I wear them here, people look at me funny. Just the other day, I put them on and my husband said, “oh, you’re wearing those?” Why, yes, yes I am. But then there are days when I’m out and about, I run into my kinfolk, and we exchange knowing glances. The shoes have become for me a connection to my favorite place. Like a beacon in the universe announcing that while my body might be here in Las Vegas, my feet are firmly planted in Portland.

IMG_1018

Styling recreated from “Shake” posted on my Instagram feed.


One of the books I grabbed that rainy day in Portland was Shake, by Eric Prum and Josh Williams. This book is a vacation for the eyes and I was immediately drawn to the authors’ spare and clean aesthetic. The cocktails in the book are as simple and clean as the photography and divided into sections reflecting each season.

WP_Products_Shake_1_1024x1024

Rosemary Maple Bourbon Sour

Rosemary Maple Bourbon Sour

  • Servings: 1
  • Difficulty: easy
  • Print

The recipe for this Rosemary Maple Bourbon Sour is lightly adapted and found in the section entitled “Autumn”. Though it is technically wintertime now, the drink is still timely, as rosemary grows year round in our garden and the lemons on my tree are plump and ripe for the picking. It’s a cozy drink, burnished with bourbon and maple syrup and fragrant with crushed rosemary.

Adapted slightly from Shake by Eric Prum and Josh Williams

  • 2 ounces Bourbon, I used Bulleit Bourbon
  • 1 ounce freshly squeezed lemon juice
  • 1/2 ounce maple syrup (the real kind, not pancake syrup!)
  • 2 sprigs of fresh rosemary

Lightly crush one sprig of rosemary in your hands until fragrant and place it into a cocktail shaker. Add the bourbon, lemon juice and maple syrup, then add ice until the shaker is half full. Shake until well mixed, then pour into a cocktail glass filled with ice. Garnish with an additional rosemary sprig and a slice of lemon.

Rosemary Maple Bourbon Sour

Ottolenghi’s Stuffed Grape Leaves and The Importance of Suckitude


Ottolenghi's Stuffed Grape Leaves with Lamb and Minted Yogurt Sauce

I’ve been doing a lot of soul searching lately. I recently saw this video of NPR host and producer Ira Glass, wherein he is speaking about storytelling and sharing about how long it takes to become good at something.

http://www.youtube.com/watch?v=BI23U7U2aUY

It really got me thinking about how I approach my writing and my photography. First let me back up. I would be remiss if I didn’t first explain that I feel like I’ve had a little bit of a breakdown over here at Salty Sweet Life.  I mean, it’s kind of been the elephant in the room, so to speak, or at least that is how I perceive things. It all started in May when I went to a photography workshop with Todd and Diane of White on Rice Couple. The workshop was really amazing. Almost three full days of intensive photography work learning from a couple who really are the best in the business. I took some of the best photos of my life during that workshop and I learned a lot. I came home, ready to crank out some masterpieces…and then reality set in. The photos that I took at home looked nothing like what I was producing at the workshop; and I was mad. The lighting in my house was challenging to deal with. I didn’t have access to a full studio worth of props and surfaces and textiles. My food looked funny. And I sucked.

Let me define “suck” for you a little better. In this context sucking at something doesn’t mean that what you are doing doesn’t have any merit at all. It just means that what you are putting out doesn’t quite meet the standard that you’ve set in your brain to reach. No matter what I did, my photos didn’t approach the quality of photos that I was producing at the workshop, not to mention they didn’t come close to looking like the work Todd and Diane were producing, seemingly effortless, on a daily basis. Even the photos they deleted far exceeded anything I could create! And this is not to say there was anything wrong with the workshop or how they taught it. What was wrong was how I thought about it. In short, I was expecting my photography, something I’ve been practicing inconsistently for less than 2 years, to be as good as someone who has been doing it at an expert level for more than 20 years! It’s staggering to me just writing that. I am offended by my own hubris!

Blogging is a challenge. Photography is a challenge. Almost anything you can undertake that’s worth doing is a challenge. I know a lot of us start blogging with stars in our eyes and think that instantly we are going to start producing content that everyone wants to read or view. We ourselves read blogs and think, hey, I can do that! I can [insert the thing you can do here]! Why not blog about it? But then it hits you that there’s a learning curve, and that maybe your traffic isn’t where you thought it would be…or that your article didn’t get featured by, well anyone. And then you realize, that you kind of suck at this. And you wonder if you should keep going, because let’s face it, sucking doesn’t feel good. And then, if you’re me, you’ll look back at 2014 and realize that for the better half of the year, you’ve been stuck in a fog of writers block, photographer’s block and general malaise, wondering if you should just throw in the towel. The thing was, I didn’t want to quit. But I certainly couldn’t keep feeling like this.

I knew I had to do something to pluck myself from this very bad, sucktastic place. Last October, while on vacation in Portland, I was browsing through the stacks at Powell’s Books and stumbled upon this really great book on the creative process called Make it Mighty Ugly, by Kim Piper Werker. I hungrily consumed the introduction right there in the bookstore, and I knew what I needed was inside this book.

Mighty-Ugly-cover-shadow

This book was life changing because it made me realize I’m not the only one with the desire to pursue a creative passion without having a clear idea of how best to express it.  Then, after expressing it, realizing that the outcome is not nearly as awesome as I’d envisioned it. I wanted to chuck my projects right into the trash. It’s frustrating. What this book taught me was not only is it ok to make ugly things but it’s ok to embrace the ugly things I create as I develop my skills. This place…this middle ground between where I aspire to be and where I currently find myself is completely normal.  In other words, unfortunately, I’m going to have to suck for a long time before I don’t suck.  And this is hard for me because I’m the oldest child of an exacting military father and and artist mother, who raised me to believe that failure was not an option and anything less than excellence was grounds for discipline.  Unfortunately, instead of pushing me to greatness, this emphasis on perfection created so much self-doubt that when I made something that wasn’t perfect, I simply stopped creating. It’s ironic how the quest for perfection paralyzed me to the point where I couldn’t even begin.

Now it’s 2015 and the start of  brand new year begs, no, requires that I make strides. That I set goals and make plans and resolve to be better than you were the year before. And so, I have resolved to suck less in 2015 than I did in 2014. And I think part of that process has to start from me learning to be ok with not being the best at everything right away and to simply be ok with sucking sometimes.  I feel great about this, because I know that it’s temporary and that one day, just as Ira Glass said, my product will match my visions and expectations.

IMG_1016

Turning over new leaves

So, in the spirit of New Year’s Resolutions, I’ll lay out a few things I’m committed to this changing this year.

1. Consistency. 2014 was all over the place. I started off the year blogging two to three times a week and ended the year barely eking out a blog post once a week. This sucks, and I know those of you who read this blog deserve better. So I am committed to getting on a more regular blogging schedule. I’m not quite sure what that schedule will be yet, but I’m working on it. 

2. Writing good. A friend of mine who reads this blog sent me an email saying that a blog post I wrote recently really resonated with her. I immediately emailed her back, anxious to know why this particular post moved her and not others. In a nutshell, she told me that it was less peppy and used fewer exclamation points than my usual posts. It was more real, more from the heart and  it showed my life wasn’t perfect. I scanned my previous posts and realized with horror that, sure enough, I was throwing around exclamation points like a rap mogul with a handful of dollar bills in a strip club! This one email probably changed me more than anything else in 2014, because it made me realize if my life looks perfect, then I’m not writing from a place of real honesty. It made me realize that sometimes I write from a place of wanting to fit in–I call this my “inner band geek”. Take a look around the blogosphere. Bloggers are a rather peppy lot. They use a lot of exclamation points and funzy words like “amaze-balls” and that’s fine, but it doesn’t really reflect my truth. I’ve never been one of the “cool kids” and I am ok with that.

Over the holidays I availed myself to the public library, a place I hadn’t been in almost a decade. I came home with a Jenga-esque stack of books from notable food writers like Ruth Reichl, Gabrielle Hamilton and Molly Wizenberg and through reading them, I realized that I want to be a much better writer than I am; and in order to be a better writer, I need to be a better reader. So, I am committed to reading good food writing in an effort to learn how to be a better food writer. This commitment is actually fun for me because I already love reading. It’s like my parents grounding me by sending me to my room, which is where I wanted to be all along. Incidently, this same friend gifted me Best Food Writing 2014 for Christmas. I took the hint and I’ve read at least one article from it every day since Christmas. I highly recommend it.

9780738217918

3. Seeing the light. I realized if I’m going to ever going to be good at photography I need to practice a lot more than I have been. One thing that Todd and Diane shared in the workshop was it takes a long time to learn to see light and how it plays off of an object. I heard them say it, but I don’t think I internalized what that meant until I got home and tried to take photos. The thought that I would actually have to practice hours and hours on food photography was an overwhelming and seemingly insurmountable task and I wasn’t feeling the joy. I hate practicing. I wish I didn’t, but I do and I’ve been this way since I was a little squirt, defiantly ignoring my mother as she desperately wrung her hands wanting me to practice the piano lessons that she could barely afford. Because I realize this trait of mine, I have committed to practice photography and food styling. Over on my Instagram feed, I am sharing some of my practice photos wherein I’m replicating photos from my cookbooks. In recreating these photos, I’m forcing myself to think about composition and lighting and along the way, I hope to improve my food styling skills.

I know I’ve blathered on for quite some time and you’re probably wondering if I’ll ever get to the recipe–I promise, I will. But I just wanted to finish with saying that I know that Salty Sweet Life can be a really good blog. In fact, I know in my heart that it can be an awesome blog…eventually (totally “amaze-balls”!). My posts may never “go viral” but they can still be good. My writing and photography can be something I’m proud to say I created, and you know, with enough work and commitment, one day it won’t suck. I hope you can stick with me for the ride!

IMG_1017

This photo was inspired by the cookbook photo from Ottolenghi

Ottolenghi's Stuffed Grape Leaves with Minted Yogurt Sauce

  • Servings: 20-25 rolls
  • Difficulty: moderate
  • Print

The recipe for these Stuffed Grape Leaves came from another of my Christmas presents, the cookbook Ottolenghi. I’d been fairly satisfied with the jarred or canned stuffed grape leaves that you can find in Eastern European markets, always assuming that it would be too much trouble to make them from scratch. While it’s not a complicated dish, it does take a bit of time to execute, so don’t try to make them if you’re in a time crunch. However, when you find yourself with some extra time and you happen to have made a New Year’s resolution to quiet your mind, this is a perfect way to achieve that. Put on some good music or a great podcast and start rolling. I really enjoyed the slow pace of stuffing and rolling. It was quite meditative and well worth the effort. The filling is both sweet and tart, dotted with sweet currants and highlighted by bright splashes of fresh mint, lemon and parsley.   The original dish is vegetarian, but I adapted it by adding a bit of ground lamb to the stuffing because we were hungry.

Adapted from Ottolenghi, by Yotam Ottolenghi and Sami Tamimi

For the Filling:

  • 1 tablespoon olive oil
  • 1/2 pound ground lamb
  • 1 onion finely chopped (the food processor works very well for this)
  • 1/2 cup short grain rice – I used arborio rice
  • 1 1/2 tablespoons lemon juice
  • 2 1/2 tablespoons currants
  • 2 tablespoons pine nuts
  • 2 tablespoons chopped parsley
  • 1/2 teaspoon dried mint – however I used 1 teaspoon fresh mint, finely chopped
  • 1/2 teaspoon ground allspice
  • 1/4 teaspoon ground cinnamon
  • 1/4 teaspoon ground cloves
  • 1/2 teaspoon salt
  • freshly ground black pepper

Remaning ingredients:

  • 20-25 jarred grape leaves, plus extra leaves to line the pan
  • 1 1/2 tsp olive oil
  • 1 tablespoon lemon juice
  • 1/4 teaspoon salt
  • 2/3 cup greek yogurt
  • 1/4 teaspoon dried dill
  • 1 teaspoon chopped fresh mint
  1. Carefully remove the grape leaves from the jar and place into a large mixing bowl. Pour boiling water over the grape leaves and allow them to sit for 10 minutes. Pat each leaf dry with a towel and set them on a sheet pan lined with paper towels. If there are any torn leaves, reserve them for lining the bottom of the cooking pot.
  2. Add the olive oil to a skillet on medium heat and add the ground beef cooking it until it is brown and crumbled. Remove the browned lamb from the pan and place in a separate bowl. Remove all but a tablespoon of oil in the pan and add the onions, sautéing them until they are softened and translucent, about 8 minutes. Add the rice and stir to coat in the olive oil. Add the remainder of the filling ingredients as well as the ground lamb and continuing cooking for 10 minutes. The rice will not be cooked through at this point.
  3. Place a medium sized grape leaf, textured and veiny side down on a work surface. Spoon about a tablespoon of the filling into the bottom half of each leaf. Mold the filling with your fingers into a cylindrical shape, then fold the sides of the leaf tightly across the filling. Roll from the bottom to the top of the leaf in a tight cigar shape. The finished roll will be tiny, a little less than 2 inches long.
  4. Layer the bottom of a medium sized heavy bottomed pan with extra grape leaves, including any torn leaves you may have set aside until the layers are about 1/8 to 1/4 inch thick.  This will keep the rolls from burning. Line the rolls on top of the layer of leaves and pack them in as tightly as possible. Pour enough water over the rolls to just cover them and add 1 tablespoon of lemon juice, the salt and the olive oil. Place a saucer on top of the rolls to keep them from moving. I also placed a glass jar of water on top of the saucer to weigh it down a bit more. Bring to a gentle boil, then immediately turn the heat to the lowest setting. Cover and cook for 50 to 60 minutes until the leaves are tender and there is very little cooking water left in the pot. Carefully remove the rolls and place them on a serving platter.
  5. In a small bowl, combine the yogurt with the dill, fresh mint, a squeeze of lemon juice. and a pinch of salt. Serve with the stuffed grape leaves.

Ottolenghi's Stuffed Grape Leaves with Lamb and Minted Yogurt Sauce

Ottolenghi's Stuffed Grape Leaves with Lamb and Minted Yogurt Sauce

Ottolenghi's Stuffed Grape Leaves with Lamb and Minted Yogurt Sauce

Thanksgiving Dinner 2014: Top 5 Things I Learned in the Kitchen

Well, Thanksgiving 2014 has come and gone and I hope your holiday was as wonderful as you’d hoped it would be. Mine was fantastic! We had a group of about 10 people for dinner and more friends came later on for drinks and dessert. I can’t even believe that it’s already December, but before we hurl ourselves full force into Christmas mode, I wanted to share 5 things that I learned from this year’s Thanksgiving dinner.

turkey

1. Turkey Technique 101. There’s a good way and there’s an even better way.

I made two turkeys this year and both employed techniques that I hadn’t used before.  I had intended to make two small  12-14 pound turkeys using the Spatchcocked Turkey with Anise and Orange recipe on the November cover of Bon Appétit Magazine. But, being thrifty, I really tried to get a deal on those two turkeys without having to drive all over town. Turns out this is an impossibility. Yes, you can get great deals on turkeys, but you will have to drive all over town. There’s a long and boring story of how I ended up with a 17 pound turkey and a 13 pound turkey but, I’ll spare you the details.

This year, I decided to use a dry brine for both birds. This is new for me, as I normally season the turkey right before putting it in the oven. With a dry brine, you coat the turkey with the seasoning the night before and let it sit overnight in the refrigerator. Then, rinse the turkey and pat it dry before roasting it. The dry brine helps season the turkey, and the salt tightens the skin, resulting in a very juicy and tender turkey.  It’s a great technique if you don’t want to deal with the complications and refrigerator space requirements of a wet brine.

For the large turkey, I used this mixture:

  • 1/2 cup kosher salt
  • 2 tablespoons brown sugar
  • 1 tablespoon lemon zest
  • 2 teaspoons freshly ground black pepper
  • 1 tablespoon thyme leaves, minced
  • 1 tablespoon rosemary, minced

I roasted the large turkey using a basting blanket. I have never used this technique before, but a friend of mine does this and I remembered drooling over the photos of her beautiful bird last year and I wanted to give it a try.

turkey-7

Turkey cooking under a basting blanket.

Before placing the turkey in the oven, I made a basting mixture by combined a stick of butter, some turkey stock, white wine and chopped herbs in a saucepan. I dipped a cheesecloth in this mixture and draped it over the bird. I basted the turkey every half hour, finally removing the cheesecloth for the last 15 minutes to brown the turkey.

On the upside, the turkey was beautiful. Like, magazine cover beautiful. The meat was moist, rich and flavorful, but, I didn’t like the skin as much, because it was rather chewy. I’m not sure if the basting blanket was the culprit here but if I had to do it all again, I’d stick to my normal turkey roasting technique of roasting uncovered at a high temperature for 30 minutes and then slow roasting for the remainder of the time. However, after making the Spatchcocked Turkey with Anise and Orange, I may abandon the traditional turkey method for good!turkey-2

This recipe was absolutely stellar! Hands down, this turkey was far superior in flavor, texture and moisture and what’s most amazing is that it took exactly 90 minutes to cook! The skin was golden and crispy and spatchcocking eliminates the problem of the breast meat drying out before the dark meat has a chance to cook thoroughly. It only took a little bit of effort to remove the backbone with kitchen shears. Here’s a quick tutorial of how to do it with a whole chicken.

turkey-8

Spatchcocked Turkey

I was a little bit nervous about using aniseed because that can be a very powerful spice, but it paired beautifully with the orange-y notes in the spice rub and was a unique and fabulous twist to our traditional turkey! Mom’s first words upon tasting it: “This turkey tastes like sausage!” I don’t know about you, but in my book, that is a complement! I would wholeheartedly recommend that you try spatchcocking a turkey when you have the opportunity–plus you get to say “spatchcock” which is probably the best word, ever.

2. The Zen of following a Recipe

This year, I decided to make several dishes from the November issue of Bon Appétit Magazine. I made the Extra Buttery Mashed Potatoes and even bought a potato ricer for the task. The potatoes were creamy, fluffy and oh, so very buttery! The potato ricer was kind of a revelation as well. I prefer to keep one-task kitchen tools to a minimum, but I’ll make an exception for this one because it really did make the potatoes creamy without the gumminess that can come from over-mashing potatoes. I also made this rye bread, kale and mushroom stuffing. I’ll admit, this was my first time using real bread that I cubed and dried and I don’t think I’ll ever go back to commercially bagged stuffing. There’s just so much more texture and flavor. What I also learned was that it is both freeing and comforting to follow a good recipe, step by step.  I am always second guessing recipes, but it was fun to actually force myself to follow a recipe to the letter (except for the stuffing recipe, I made a few minor changes to it).

turkey-9

The makings of Rye, Kale and Mushroom Stuffing

3. Use your BBQ grill as a warmer

I’m not sure why I never thought of doing this before, but you know how it is in that last hour when the turkey has cooled but there’s no more room in the oven to keep it warm? If you have a gas or propane grill, it can be your best friend at this crucial moment. I lit one burner on low heat and placed the platters of carved turkey (covered in foil) on the grill. It warmed the turkey without drying it out and everything was piping hot at serving time. Just remember not to place the platters directly over the flame.

4. Make turkey stock in the crockpot

My mother always taught me that the first task on Thanksgiving morning is making the turkey stock from the turkey neck, giblets, carrots, celery, onions, salt and pepper. I’ve always done this on the stove top and while it has always worked, it does take up valuable real estate. Meanwhile, my trusty crockpot just sat in the pantry unused until it was called upon to keep the mashed potatoes warm. Well, this year, a little light bulb went off in my head and I made the stock during the night in the crockpot. I woke up to a pot of rich, golden turkey broth that I used for the stuffing and the gravy. Also, after every Thanksgiving dinner, I wrap the turkey carcass in foil and put it in the freezer to make more stock in the future. The only problem with this is that it takes up a lot of room in the freezer. What’s more, by the time I need to make stock, the carcass is frozen solid and won’t fit into my pot, which leads me to my next tip: after Thanksgiving dinner is over, put the turkey carcass into the crockpot and make another batch of stock overnight! Again, why have I never thought of doing this before? Now I have 3 quarts of homemade turkey stock in my freezer that’s ready go when it’s time to make soup!

turkey-5

This isn’t pretty, but it’s hard to pretty up a carcass.

5. Task Your Family and Friends with Taking Photos

We are incapable of taking pictures during a party. Notice that the photos above were mostly iPhone photos taken before the food was finished? Between the cooking and taking care of our guests, we were lucky that we managed to take a photo of the turkey. From here on, I’m tasking my guests with taking photos of the food, because apparently, we just cannot. So, my friends, if you are reading this and you’re coming to my house for dinner, you’re the photographers! I’ll set up a hashtag.

turkey-4

I hope these little tips and tricks were helpful! Did you learn any new tricks this year? I’d love to know in the comments.