Latest Posts

A New Succulent Garden and Blistered Shishito Peppers

terrarium

I kill succulents.  I kill them so often and so quickly that the garden center should probably have my picture on their wall with a notice saying “Do Not Sell Succulents To This Woman”.  But so far I’ve been able to elude them or they’ve just decided that they make a lot of money from me and my succulent exploits.  With that in mind, please know that this is not a tutorial on keeping succulents alive!  I wanted to rehab this terrarium from a couple of years ago that has been dormant for…18 months.  That means I was able to keep the succulents that were originally in it alive for 6 whole months.  This also means that I’ve had a big bowl of dirt sitting in my bathroom for a year and a half.  I saw this tutorial on West Elm’s website a while ago that showed how to make a succulent garden and suggested leaving the plants in their original pots–which seemed perfect for me!  At least this way, when I kill them, they will be easy to replace!  So, yesterday, needing to do something with my hands, I trundled over to the garden center for new succulents, some cactus planting mix and little white rocks.

terrarium-4

Since I was rehabbing an old terrarium and not starting from scratch, I had to do a little prep work.  I discarded the old dirt and cleaned the rocks that had formed the bottom layer of the garden. I then washed the bowl with vinegar and water.  After the bowl was completely dry, I poured a two inch layer of small rocks into the bottom of the bowl and then nestled the plants in their original pots into the rock layer.  The moon cactus–that’s the one with the red top, had to be taken out of its pot because of its height, so I had to very carefully (wearing gardening gloves) set that one into place.  I took the cactus planting mix and carefully scooped it into the bowl high enough to cover the tops of the succulent pots.

terrarium-3

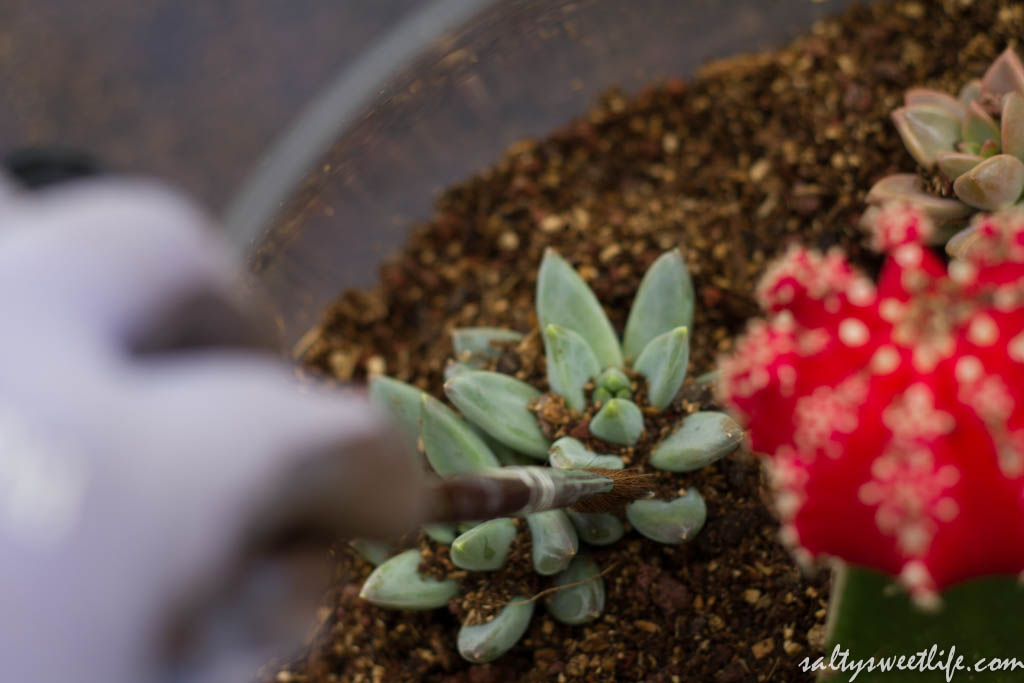
With a small, soft paintbrush I brushed off the soil that fell onto the plants.  After that was done, I finished with a thin layer of small white pebbles,  again using the paintbrush to dislodge the rocks from the plants as well.

shishitopeppers-7

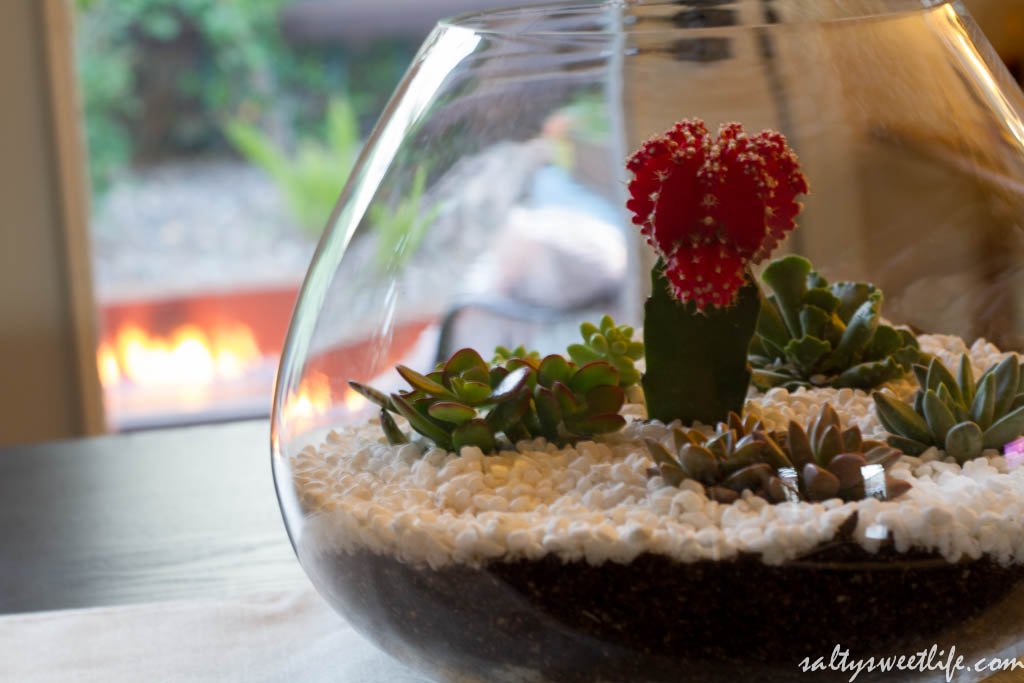
I’m pretty pleased with the outcome!  It’s sitting on my dining room table, where it gets filtered sunlight from the backyard.  I am going to try my best to keep these little guys alive!  Knowing my tendency to over water, I’m going to set a reminder and only give them a small amount of water every 7 to 10 days.  If anyone has some advice for me, please, feel free to write them in the comments section!

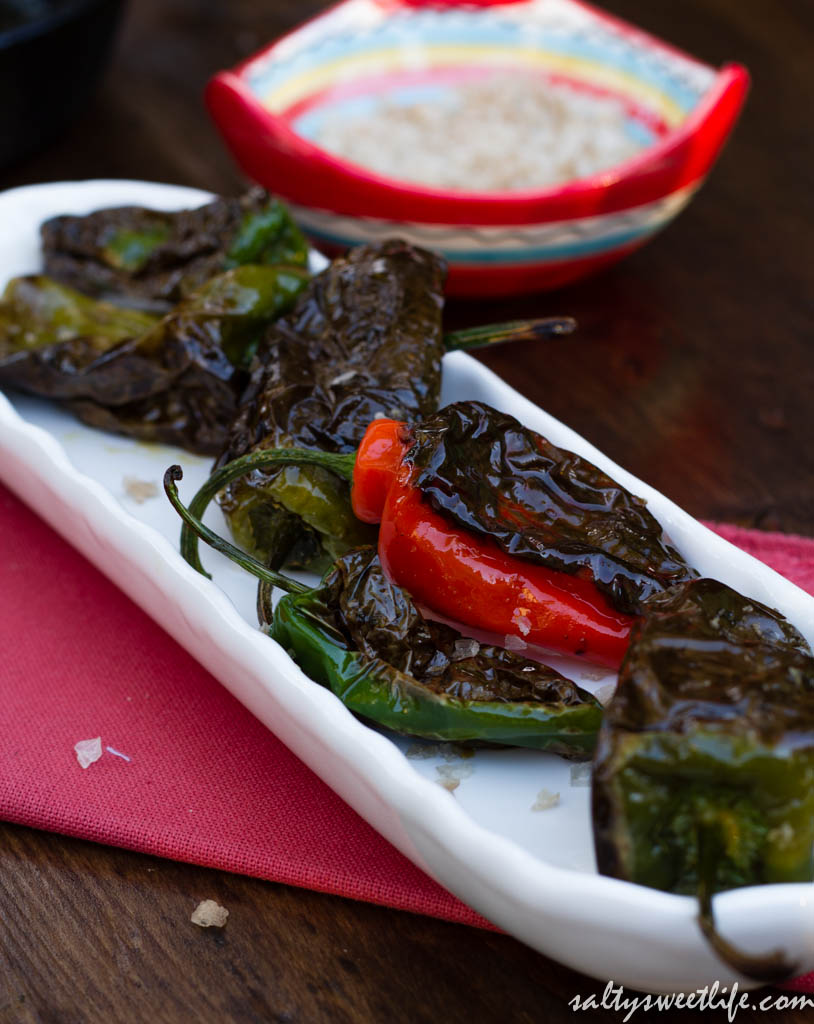
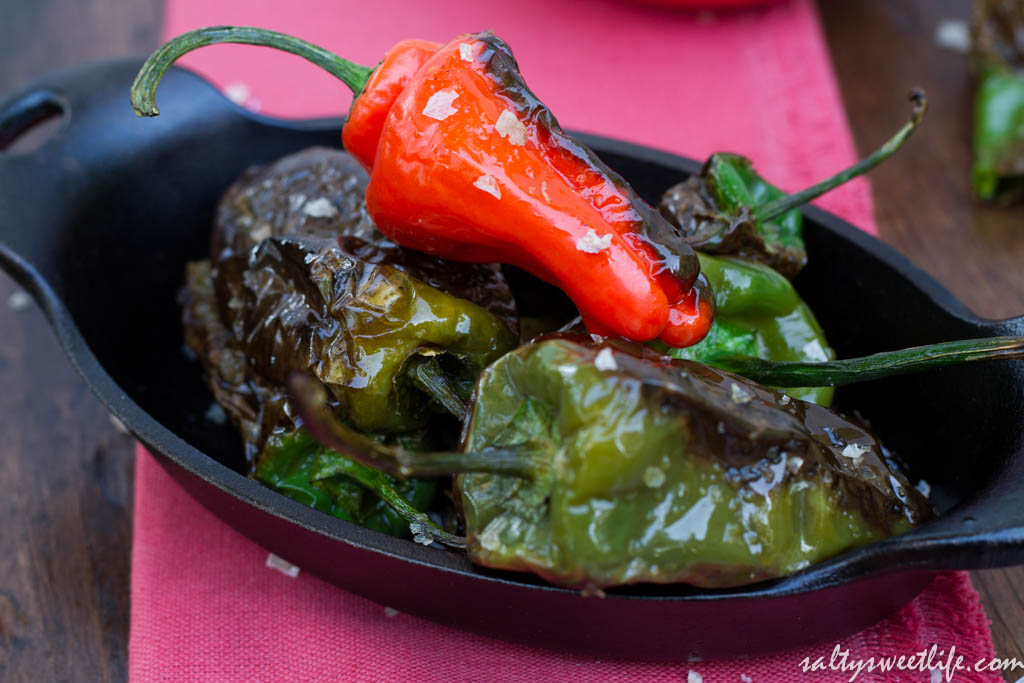
During the week, I was able to find these beautiful Padron peppers at Whole Foods Market.  If you’ve ever been to a tapas bar or even a sushi bar, you will have encountered these as appetizers and they are amazing!  If you see them at a sushi bar or Japanese restaurant, they are typically called Shishito Peppers and at a tapas bar, Padron Peppers.  The preparation is so simple that you don’t even need a recipe!  Three ingredients–olive oil, peppers, flake salt and you can make these at home for pennies! Adjust the amount of peppers as you require. Since I was on my own yesterday, I only made enough for me, but you can figure about 5 to 6 peppers for each person as an appetizer.

shishitopeppers

The fun thing about these peppers is that some of them are quite mild and others will blow your hair back, albeit not in a beads-of-sweat-on-your-forehead kind of way.  A good amount of heat–just enough to keep life exciting!  The red one was actually the mildest of the bunch and was very sweet. The charring of the skin gives them a wonderful, smoky flavor as well.

Blistered Shishito Peppers

  • Servings: varies
  • Difficulty: easy
  • Print

  • Padron/Shishito Peppers (however many you need, this is flexible)
  • 2 tablespoons olive oil
  • Flake Sea Salt (Maldon Salt)
  1. Heat the olive oil in a frying pan over high heat until the pan is almost smoking.
  2. Add the peppers a few at a time to the frying pan, being careful not to crowd the pan. When the skin blisters use tongs to turn the peppers over and cook the other side until the peppers begin to shrivel, about 2-3 minutes.
  3. Remove each batch from the pan and place them on a serving dish and keep them in a warm oven (about 170 degrees). Repeat with the remaining peppers until they are all cooked. Sprinkle generously with the flake salt and serve piping hot as an appetizer!

shishitopeppers-3

shishitopeppers-5

shishitopeppers-6

Maple, Ginger and Thyme Glazed Carrots and Sweet Potatoes

gingermaplecarrots-5

A good friend of mine asked me the other day whether I’d ever made carrots with ginger before.  I thought about that question and my short answer was that I had, but then I couldn’t remember the last time I’d made them. I started to realize that I rarely make carrots as their own side dish, mainly because The Husband doesn’t really like carrots.  He’ll eat them, but he doesn’t enjoy them and that’s really saying something because he is the least picky eater on the planet!  So as my friend and I were talking, I started thinking the sweet potatoes that I recently roasted in coconut oil.  This, in turn had me daydreaming about how amazing carrots would taste alongside those sweet potatoes, roasted in coconut oil and glazed with maple syrup and ginger!  I was instantly obsessed with the thought and went straight to the grocery store after work for carrots and ginger!  I came home and within minutes I was enjoying possibly the easiest and best recipe I’d made in a long time! Roasting the vegetables in coconut oil brought out the natural sweetness of the root vegetables and cloaked them in a mild, coconut-ty flavor, while the ginger-maple syrup glaze took them right over the top and made them sinfully delicious!   My mother happened to pop by right around the time I was pulling them out of the oven and she loved them so much that she asked me if she could take them home for her dinner. Since I could not possibly refuse such a request from my mother and because I knew I could easily whip up another batch in mere minutes, I waved goodbye to my new favorite treat and immediately started making more.  Less than a half hour later, The Husband and I were eating that second batch with our dinner! I am pleased to say that he ate them all and was looking for more!  I think I’ve converted him into a carrot fan!

gingermaplecarrots-8

I am not sure why it’s taken me so long to cook with coconut oil.  My mom has been using it for well over a year, but I’ve always been a tried and true olive oil girl.  I’ve since discovered that coconut oil adds a mild, slightly sweet coconut flavor to the food and after using it to roast these root vegetables, I don’t know if I’ll ever eat them any other way! I used Trader Joe’s Organic Virgin Coconut Oil. If you’ve never used coconut oil before, I hope you’ll give it a try–they really make this dish. Know that it’s solid at room temperature, but it melts very quickly. The carrots I found ranged from small and thin to large and thick. I simply cut the larger ones into eighths to make them more manageable. I used organic rainbow carrots, which I affectionately call “Blogger Carrots”. They are not only beautiful to look at, but each color has a slightly different flavor as well. Regular carrots will also work just fine!

Maple, Ginger and Thyme Glazed Carrots and Sweet Potatoes

  • Servings: 2-3
  • Difficulty: easy
  • Print

Preheat the oven to 400 degrees

  • 1 bunch of rainbow carrots (about 5) peeled and cut into 1/2″ by 4″ pieces
  • 1 sweet potato peeled and cut into 1/2″ by 4″ pieces
  • 3 tablespoons real maple syrup
  • 1 inch knob of fresh ginger grated with a microplane grater
  • 1 teaspoon fresh thyme leaves, minced
  • 1/2 teaspoon lemon zest
  • 1 teaspoon lemon juice
  • 1-2 tablespoons coconut oil
  • salt and pepper
  1. With a vegetable peeler, peel the carrots and sweet potato, then cut them into 1/2 inch by 4 inch sticks.  Scatter the sweet potatoes and carrots on a large baking sheet and sprinkle with a four-finger pinch of salt and freshly ground black pepper. Dot the vegetables with the coconut oil and place into the oven. The oil will melt after about a minute or two in the oven. Gently toss the vegetables in the melted oil to coat them and place back into the oven. Cook for 20 minutes.
  2. While the vegetables are roasting, stir together the maple syrup, grated ginger, thyme, lemon zest and lemon juice in a small bowl. Try not to eat it all before the veggies finish cooking! Seriously, it’s that good.
  3. At the 20 minute mark, pour the maple syrup mixture over the vegetables and toss to coat. Put the vegetables back into the oven and roast for an additional 5 minutes or until the vegetables are tender. Garnish with fresh thyme leaves and extra lemon zest, if desired.

gingermaplecarrots

gingermaplecarrots-2

gingermaplecarrots-3

Oscar-worthy Cocktails and Nosh!

The 86th Annual Academy Awards are this evening and this year, I’ve actually seen quite a few of the nominated films! I feel like I have some skin in this game now!  I won’t be having an Oscar party, but you can be sure that I’ll be watching the show with a cocktail in hand along with some great snacks!  So, whether you are having a party or just looking for a few ideas for what to snack on tonight while you’re watching the show, might I offer a few suggestions?

I’ve been to enough parties to know that people love deviled eggs!  Try these smokey, spicy  deviled eggs along with the frothy Lusty Lady topped with some Cognac-soaked cherries!  It just speaks Hollywood Glamour!

Lusty Lady with Deviled Eggs

Lusty Lady with Deviled Eggs

This homage to Oscar Winner, Ginger Rogers is one of my favorites!  The Ginger Rogers is a double dose of ginger flavor, combining spicy ginger beer with ginger simple syrup.

Ginger Rogers

Or perhaps this fruity Blood Orange Margarita?  Awesome for a Mexican food-themed party!

Blood Orange Margarita

Blood Orange Margarita with Bitters

This Framboise 75  is a perfect choice if you’re feeling particularly fancy-schmancy! Who doesn’t love champagne? If your evening includes gliding around in a ball gown, this is your drink.  Most definitely.

Framboise 75

Framboise 75 – A French 75 with Raspberries and St. Germain Liquer

And how about something to snack on?  Try these Crostinis with Burrata Cheese and Kalamata Olive Tapenade!  So delicious! The tapenade will also be amazing atop Ina Garten’s Parmesan-Thyme Cheese Crackers.

Crostinis with Burrata Cheese and Kalamata Olive Tapenade

Crostinis with Burrata Cheese and Kalamata Olive Tapenade

Ina Garten's Parmesan-Thyme Crackers

Ina Garten’s Parmesan-Thyme Crackers

These Manchego Cheese and Olive Crackers are just as easy to make as the Parmesan-Thyme crackers and they are a perfect vehicle for the Creamy Radicchio Spread.

Manchego Cheese Crackers with Creamy Radicchio Spread

Manchego Cheese Crackers with Creamy Radicchio Spread

Sizzling Mushrooms with Sage and Thyme are so good served on a crostini with creamy ricotta cheese.

27df1-img_0210

So which films are you rooting for this year?  I can’t quite decide between “12 Years a Slave”, “Captain Phillips” and “Dallas Buyer’s Club”.  All three are among my favorites!  
Looking for more cocktail ideas?  The “Cocktails” category has a full list of all the cocktails I’ve made so far! Cheers!

Cocktail of the Week: It’s About Thyme! Plus, Parmesan-Thyme Crackers

itsaboutthyme-2

Last weekend, I planted four new thyme plants in my little herb garden, so in honor of that, I’m featuring thyme in this week’s cocktail and finger food! This was the first cocktail The Husband and I learned to make together.  Inspired by that year’s winner of the 2011 Signature Spring Cocktail Contest: “No Thyme Like the Present“; it was served as the signature drink at my 40th birthday party (my, how time flies)!  The original recipe is a Hendrick’s Gin cocktail flavored with fresh thyme, subtle hints of cucumber and finished with a float of white grape juice.   The drink was amazing! It was cool and refreshing and perfect for an outdoor summer gathering. What I remember most was that I only had one glass of it and I was the Birthday Girl!  Why do I always get cut off so early?  Well, that was a few years ago, and I think my tolerance has increased a bit since then!

My version of the recipe uses more gin, less juice and incorporated the herbs de Provence simple syrup that we made for last week’s Lusty Lady Cocktail.  I think the resulting drink is more balanced and the simple syrup really amplifies the thyme. Hendrick’s Gin is a great choice for the original cocktail as it pairs so well with cucumber simple syrup, but I’ve used Hayman’s Old Tom Gin, which is a sweeter gin, for this one.  Either gin would be perfect in the drink.

It's About Thyme

  • Servings: 1
  • Difficulty: easy
  • Print

  • 2 ounces gin, either Hendrick’s Gin or Hayman’s Old Tom Gin
  • 1/2 ounce freshly squeezed lime juice (one whole lime)
  • 1/4 ounce herbs de Provence Simple Syrup
  • 2 sprigs of fresh thyme
  • 2 ounces white grape juice

Muddle one sprig of thyme in a cocktail shaker. Add the gin, lime juice and simple syrup to the cocktail shaker along with a cup of ice. Give it a few good shakes and strain into a Collins glass filled with ice. Top off each glass with the grape juice and garnish with the second thyme sprig.

Now, if you want to really impress your friends, make these Parmesan-Thyme Crackers! I started making this crackers over the holidays last year and they were such a hit that I’ve been getting special requests for them ever since! I found the recipe in Ina Garten’s “Barefoot Contessa, Back to Basics” cookbook, which I adore. I most recently made a double batch to bring to a friend’s birthday party and folks went gaga over them! Trust me, people are impressed when you bring homemade crackers to a party! I paired them with  herbed ricotta cheese and this amazing olive tapenade and let me tell you, that was an awesome bite! The crackers are rich and buttery and the fresh parmesan cheese and thyme just take them over the top! Perfect for a cocktail party!

itsaboutthyme-4

Ina Garten's Parmesan Cheese Crackers

  • Servings: 24 crackers
  • Difficulty: easy
  • Print

  • 1/4 pound (1 stick) unsalted butter at room temperature
  • 1 cup freshly grated Parmiggiano-Reggiano cheese
  • 1 1/4 cup all purpose flour
  • 1-2 teaspoons fresh thyme, minced
  • 1/2 teaspoon kosher salt
  • 1/2 teaspoon freshly ground pepper
  • water

Preheat oven to 350 degrees

  1. In the bowl of a stand mixer fitted with the paddle attachment, cream the butter for about one minute on medium speed.
  2. Reduce the speed to low and add the cheese, thyme, salt and pepper.
  3. Slowly add the flour and continue mixing until it forms large crumbs. Stop the mixer and test the dough with your fingers. If it is too dry and doesn’t stick together, add water one teaspoon at a time until it becomes just moist enough to stick together. Because I live in a desert climate with no humidity in sight, I had to add nearly 1/4 cup of water to get the dough to come together properly.
  4. Dump the mixture onto a lightly floured surface and shape into a ball, then press into a rough log shape. Wrap the rough log with a length of plastic wrap and carefully roll it into a more even cylinder shape. If you can get the cylinder perfectly round, kudos to you!  Mine usually end up slightly squared! Twist the ends and place the log into the refrigerator for 30 minutes and up to 4 days, if making ahead.
  5. Slice the crackers into 3/8″ thick rounds and place them on a baking sheet lined with parchment paper.
  6. Bake for 22 minutes until the crackers are light golden brown, rotating the pan 11 minutes into baking.

itsaboutthyme-5

itsaboutthyme-3

itsaboutthyme

Roasted Tomato Caprese Salad with Kale Pesto

capresesaladkalepesto-7

I recently purchased “The Sprouted Kitchen” cookbook by Sara Forte and I became a little bit obsessed with this one particular recipe for “Heirloom Tomato Stacks with Bocconcini and Kale Pesto”; so much so, that I’ve made it twice this week!   The original recipe, with its beautiful photograph of mid-summer, juicy heirloom tomatoes nestled on top of a bed of pesto and stacked between layers of fresh mozzarella cheese lured me right in!  I was hooked!  The only problem is…it’s not mid-summer.  Not by a mile.  And you and I both know that February tomatoes leave a lot to be desired–they aren’t very sweet; they are often flavorless at best and mealy at worst.  I’ve learned that slowly roasting tomatoes with a bit of olive oil, a sprinkle of sugar, salt, pepper and garlic totally solves the problem of less-than-flavorful off-season tomatoes, so you can have this salad year-round! The kale pesto is also a stroke of in-season genius, as it’s too early for fresh basil as well!  The kale pesto is a perfect counterpart to the sweet, roasted tomatoes and the creamy mozzarella.

I was also able to stretch this salad into a second meal! I tossed the leftover pesto and roasted tomatoes with whole wheat pasta for a delicious and healthy dinner!

capresesaladkalepesto

The tomatoes roast in a 275 degree oven for almost 2 hours, so take the timing into account. The first time I made this dish, I used a small bunch of kale from the market. The second time, I used pre-chopped, pre-washed Tuscan kale that I found at Trader Joe’s–what a great time saver! I found the mozzarella balls, or “ciliegine” at Trader Joe’s as well.

capresesaladkalepesto-3

Roasted Tomato Caprese Salad with Kale Pesto

  • Servings: 4
  • Difficulty: easy
  • Print

Adapted from The Sprouted Kitchen by Sara Forte

For the roasted tomatoes:

  • 8 Roma tomatoes, halved, seeds removed
  • 2 teaspoons brown sugar
  • 2 cloves garlic, minced
  • generous pinch of kosher salt
  • freshly ground black pepper
  • olive oil

Preheat the oven to 275 degrees

Place the tomatoes on a sheet pan and drizzle with the olive oil. Sprinkle them with garlic, the brown sugar, salt and pepper and place them in the oven. Roast for 1 1/2 to 2 hours or until the tomatoes are tender and caramelized.

For the pesto:

  • 1 small bunch of Lacinato (Tuscan) kale, ribs removed, roughly chopped (about 5 handfuls)
  • 2 cloves of garlic
  • 1/3 cup freshly grated Parmesan or Parmiggiano-Reggiano cheese
  • zest and juice of one lemon
  • 1/2 cup walnuts, lightly toasted
  • 1/4 cup plus 2 tablespoons extra virgin olive oil
  • 2 tablespoons water
  • 1 container of “ciliegine” or “bocconcini” (small-sized fresh mozzarella balls)
  • 1/2 teaspoon kosher salt
  • 1/2 teaspoon freshly ground black pepper
  1. Bring a large pot of salted water to a boil. Drop the kale into the water and cook for about one minute, then drain the kale in a strainer. Immediately run cold water over the kale to stop the cooking process. After the kale has cooled, squeeze out the excess water with your hands and set it aside.
  2. Lightly toast the walnuts in a small dry frying pan over medium heat for 2-3 minutes, tossing often to keep it from burning. Remove from the heat.
  3. In the bowl of a food processor fitted with the metal blade, combine the garlic, walnuts, lemon zest, lemon juice and parmesan cheese. Pulse to combine.
  4. Add the kale, salt, pepper and water to the food processor bowl. Pulse to combine. Then, with the food processor running, slowly pour the olive oil into the feed tube and continue to process until the mixture is smooth. Taste and adjust the seasoning if needed.
  5. Drain the ciliegine and toss with 1/2 cup of the kale pesto. To assemble the salad, place a generous spoonful of the pesto on a salad plate. Top with two roasted tomatoes, then a few of the mozzarella balls followed by another two roasted tomatoes and more mozzarella. Garnish with freshly grated parmesan cheese and a drizzle of balsamic vinegar if desired. Serve at room temperature.

capresesaladkalepesto-10

capresesaladkalepesto-11

I know that some of you are still in deep-freeze mode, but Spring is well on it’s way where I live!  Over the weekend, I started my herb garden!  In previous years, I’ve planted herbs in my backyard, but this year, I’m doing a little experiment and seeing if the front yard might have better sunlight.  Hopefully, in a few weeks I’ll be able to make pesto from my new basil plants!

IMG_0723

Cocktail of the Week: The Lusty Lady, plus Deviled Eggs

Lusty Lady with Devilled Eggs

I’m pretty excited to share this cocktail with you because, well, it’s delicious and it’s pretty, but also because it’s one of those recipes that just came together perfectly just the way I imagined it!  Last week, I attended an amazing cocktail party benefitting the Helen David Relief Fund for Bartenders Affected by Breast Cancer.  The event featured 12 specialty cocktails prepared by some of Las Vegas’ most esteemed mixologists!  I only made it through 5 cocktails that night (and that was an amazing feat all it’s own) but I left there with a fuzzy memory of  a pretty, frothy cocktail garnished with a sprig of fresh lavender.  And with that vague memory, came the inspiration for this cocktail.

Now, if last week’s cocktail, the Martinez, could be considered a man’s drink, then this one is for the ladies!  And by that I mean in a “strong enough for a man but made for by a woman” kind of way!  Like the Martinez, it’s a gin-based cocktail, but lightened up with an egg white froth, an herbes de Provence infused simple syrup, a splash of lavender bitters and garnished with Cognac-soaked cherries! What could be better? I found the original recipe for the Lusty Lady on the Scrappy’s Bitters website, but have changed it a little to enhance the herbal and floral notes of the lavender bitters.  The bitters are a fairly essential part of this drink and if you don’t already have bitters in your home bar, Scrappy’s Bitters has a great selection.  I found them locally at Total Wine and they actually had a bitters assortment that included orange, lavender, celery and aromatic bitters. You may have noticed that there is an egg white in this drink–egg whites are used in quite a few classic cocktails and it adds a creamy, frothy cap, almost like a latte. Of course, use fresh eggs from a reputable source, but also know that the lime juice and the alcohol in the gin will neutralize the risk of pathogens.

Lusty Lady

The Lusty Lady

  • Servings: 1
  • Difficulty: easy
  • Print

  • 2 ounces gin, preferably Hayman’s Old Tom Gin
  • 1/4 ounce pomegranate juice
  • 1/2 ounce herbes de Provence simple syrup**
  • 1/2 ounce fresh lime juice
  • 1 egg white from an actual egg (please, in the name of all that is holy, do not use “egg beaters” in this drink)
  • 2-3 dashes of lavender bitters
**Plain simple syrup can be used for this drink, but I wanted to highlight the floral notes of the lavender bitters with a simple syrup infused with herbs de Provence.  Typically commercially produced herbes de Provence will include marjoram, savory, rosemary, thyme, lavender, basil and sage. You probably have some tucked in the back of your spice rack and it’s probably lonely, so go take it out and use it! You’ll want to first make sure that your spice blend does not include garlic, because that would not be tasty!  Simply combine one cup of water and one cup of sugar and one tablespoon of the herbs de Provence in a small saucepan and heat until the sugar completely dissolves.  Remove from the heat, cover the pan and steep for about 30 minutes.  After the mixture has cooled, strain through a fine mesh sieve lined with a paper towel and store in a glass jar in the refrigerator. 
  1. While your simple syrup is steeping, make the cherry garnish by placing dried cherries in a microwavable bowl with 1/4 cup of brandy or cognac. Place in the microwave for 30 seconds, and let the cherries soak until they become plump. Thread the cherries onto a skewer or drink pick and set aside.
  2. Place all the ingredients in a cocktail shaker and shake vigorously until frothy. Add a few ice cubes and shake a few seconds more to cool the drink. Strain into a frozen coupe or cocktail glass. Top with the boozy cherries!

Devilled Eggs

How about some smoky deviled eggs to go with that cocktail? Deviled eggs are on my list of foods that I can’t resist, like hot french fries, potato chips, and anything involving a cocktail wiener! I fully intended to bring a batch of these to work after I tested them, but I ate them all. Sorry guys! The smoked paprika and curry powder give these eggs a wonderful smoky flavor which is balanced by the subtle heat from the cayenne pepper. Briny capers step in for the sweet relish typically found in traditional devilled eggs.

Blue Smoke Deviled Eggs

  • Servings: 6-8
  • Difficulty: easy
  • Print

Adapted from the recipe for “Blue Smoke Deviled Eggs” from “Mix Shake Stir” by Danny Meyers.

  • 10 large hard-boiled eggs
  • 7 tablespoons good mayonnaise
  • 1 teaspoon red wine vinegar
  • 2 teaspoons Dijon mustard
  • 1/4 teaspoon dry mustard
  • 1/4 cayenne pepper
  • 1/4 teaspoon curry powder
  • 1/4 teaspoon smoked paprika
  • 2 teaspoons capers, drained
  • salt and freshly ground pepper to taste (add at the very end)
  1. Peel and halve the hard boiled eggs. Scoop out the yolks and place them in the bowl of a food processor along with the remainder of the ingredients, except for the salt and  pepper. Pulse a few times to combine, then process until the mixture is creamy. Taste the mixture and add a pinch of salt if needed, though you likely will not need any because of the saltiness of the capers.  Add a few grinds of freshly ground black pepper and mix thoroughly.
  2. Put the mixture into a piping bag if you like feeling annoyed, and pipe the mixture into the egg whites. If you want to be less fussy, simply spoon a small amount of the yolk mixture into each egg half. Garnish with a sprinkle of paprika and a caper if desired. Try not to eat them all!

Lusty Lady

Lusty Lady

Farmer’s Market Breakfast with Poached Eggs

fmbreakfast-11

I have a confession to make.  Until today, I have never successfully poached an egg. It’s crazy, I know!  I mean, egg-poaching is a very basic cooking skill and I feel so ashamed that until now, it has completely flummoxed me.  About a year or so ago, I was bound and determined to learn the proper technique, only to end up with a pot of what looked like egg-drop soup.  I tried again and again; and again and again, I failed. I was told my eggs were too fresh. Then I was told that maybe they weren’t fresh enough! And then, this week I happened upon a little article in Real Simple Magazine about the many uses of a meat thermometer that just happened to mention that the ideal temperature for poaching eggs was 180 degrees fahrenheit!  Eureka! That was the variable I never considered in my earlier attempts.  I knew that the water should be barely simmering, but I never thought to check the temperature.  Well, that’s what I did, and SUCCESS!  Beautiful, silky, decadent, perfectly-poached eggs!  I feel like a winner now and if you’ve ever had trouble with poaching eggs, I encourage you to try one more time and check that one little variable:  temperature!

fmbreakfast-8

Not too long ago, I had a similar dish at a nice restaurant in town that serves brunch on the weekends.  They called it a “farmer’s market breakfast” and it was $14!  Simple and rustic, it was beautiful combination of roasted fresh vegetables, creamy goat cheese and those amazing poached eggs.  In replicating this restaurant dish, I used a combination of fingerling potatoes, asparagus, tomatoes, carrots and mushrooms. It’s perfect for a weekend brunch as it takes a little extra time; but, if you’ve prepared the fingerling potatoes beforehand, the dish comes together very quickly.  This recipe is very flexible.  I have included approximate amounts for two people, but you can make as many vegetables as you wish for each person. Plan on two poached eggs per person. Poach the eggs during the time that the vegetables are roasting and keep them in a bowl of hot water until you are ready to serve them.

I learned how to make perfect fingerling potatoes from my friend, Alexandra from the blog, Alexandra’s Kitchen and I have been making potatoes this way ever since! It is truly the easiest and best way to make well seasoned potatoes that are not at all mushy or overcooked.  You might balk a bit with the amount of salt called for in the recipe, but I promise you, the potatoes will not be over salted!

Simply place the fingerling potatoes (about a pound or so) in a saucepan with a heaping quarter cup of kosher salt, 3 cloves of smashed garlic, a few sprigs of fresh rosemary and thyme and enough water to cover the potatoes by about 2 inches.  Bring the pot to a boil, then turn off the flame and cover the pot.  When the potatoes have cooled, they are done! Simply drain them and slice them in half for this recipe.  Store any leftovers in a sealed container and use throughout the week!

fmbreakfast

Farmer's Market Breakfast

  • Servings: 2
  • Difficulty: easy
  • Print

Preheat oven to 450 degrees

For the vegetables:

  • 10 fingerling potatoes, pre-cooked as described above and cut in half
  • 10 grape or cherry tomatoes
  • 6 white button mushrooms, quartered
  • 10 thin asparagus spears, trimmed of woody ends
  • 2 carrots, peeled and cut into quarters
  • olive oil
  • salt
  • pepper
  • goat cheese (I used an herbed goat cheese)
  • fresh parsley and green onion for garnish
  • 1 tablespoon fresh lemon juice

For the poached eggs:

  • 2 eggs per person
  • 1 tablespoon apple cider vinegar
  • water
  1. Place all of the vegetables on a baking sheet and drizzle with olive oil and toss to coat. Season the vegetables with a generous pinch of salt and a few grinds of black pepper.
  2. Place the vegetables in the 450 degree oven and roast the vegetables for 20-25 minutes.
  3. Fill a medium saucepan with the water one tablespoon of apple cider vinegar. Bring the pot up to a slow boil, then lower the heat until the water is barely simmering.  Use a meat thermometer to check that the temperature has reached 180 degrees. Fill a medium sized mixing bowl with very hot tap water. Break an egg into a small cup or ramekin. When the water is steady at 180 degrees, take a spoon and gently stir the water in a clockwise direction. Pour the egg from the ramekin into the center of the swirling water. The swirling water will gather the egg whites around the yolk. Now set a timer for exactly two minutes. After two minutes, gently lift the egg from the water with a slotted spoon and place it into the bowl of hot water. Repeat this method with each egg.
  4. When the vegetables have finished roasting, check the seasoning and add additional salt and pepper if needed. Toss the vegetables with the lemon juice and sprinkle with crumbled goat cheese. Place a portion onto each plate and top with two well-drained eggs. Sprinkle the eggs with salt and pepper and then garnish with the parsley and green onion.

fmbreakfast-2

fmbreakfast-4

fmbreakfast-5

fmbreakfast-10