Latest Posts

The Year I Learn to Bake: Ina Garten’s Baked Chocolate Pudding

IMG_0354

My stand mixer has been sitting on the countertop, patiently waiting for me to remember my New Year’s resolution to learn how to bake.  I’ll bet you thought I’d forgotten about it, too!  More likely, I’ll bet you thought it would be so much more fulfilling to resolve to be more organized or eat fewer calories…or perhaps even exercise more?  And not that there’s anything wrong with being virtuous, but aren’t most resolutions broken by the middle of February anyway? So, this was my way of setting myself up for success.   This is how you WIN at resolution-making:  make resolutions that you actually don’t mind keeping long-term!

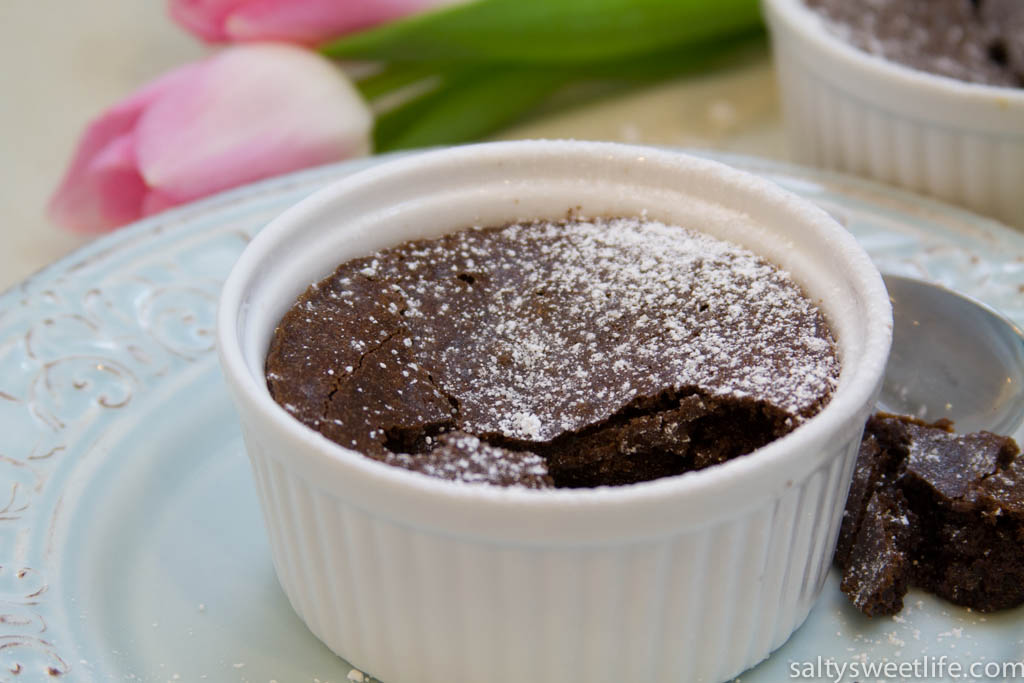
Being that it’s Valentine’s Day and I’m not adept at this whole baking thing yet, I decided to try something easy; something fairly fool-proof that didn’t contain anything terribly exotic and could be whipped up in mere minutes.  This recipe for Baked Chocolate Pudding fit the bill perfectly! I found it in Ina Garten’s “Back to Basics” cookbook and true to Ina’s form, there were only seven ingredients, all found in my pantry (if you don’t count my forgetting to replenish my vanilla bean paste supply).  I made two changes to the original recipe.  The original recipe called for a tablespoon of framboise (raspberry) liqueur, which I did not have and did not intend to run out and buy.  Since we have plenty of liqueurs in the pantry it was just a matter of finding one that I liked. I tried orange, maraschino and coffee liqueurs and settled on the coffee, because I love the flavor of chocolate and coffee together! Also, the original recipe is baked in an oval baking dish, but because I wanted small individual servings, I baked them in cute little ramekins.

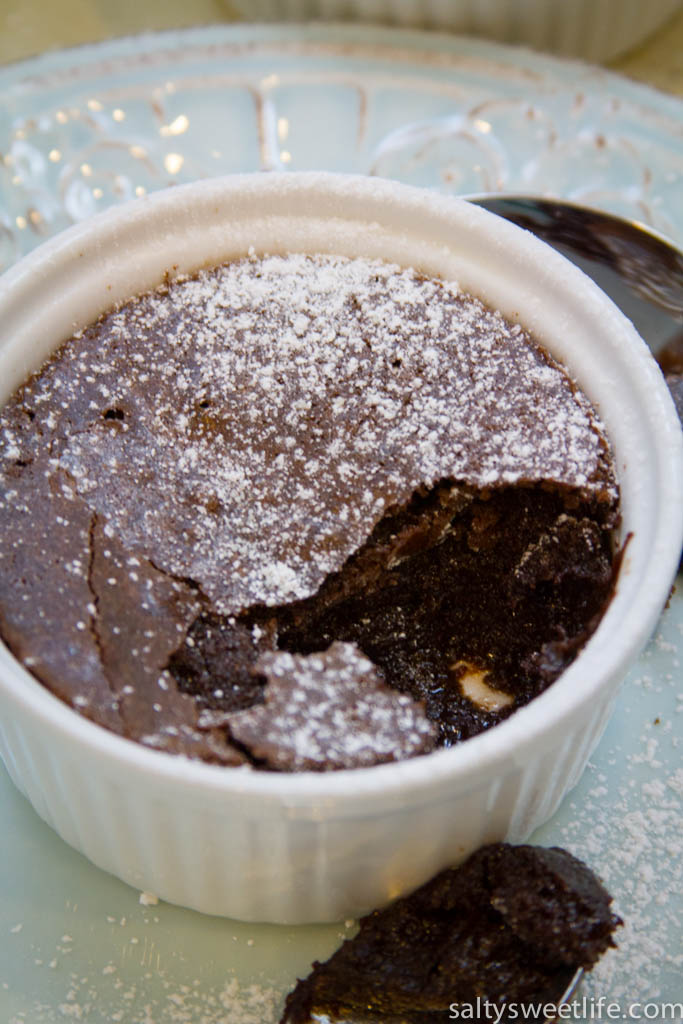
This dessert will remind you of being a kid and licking the cake batter from a spoon! It’s something of a cross between a brownie and a molten lava cake–the top and sides form a crunchy shell, that when broken, reveals a melty center! It’s rich and chocolaty, sweet and decadent! I served it with a dollop of mascarpone cheese which I think balanced the sweetness of the dessert perfectly.

Baked Chocolate Pudding

  • Servings: 6
  • Difficulty: easy
  • Print

Adapted from: Barefoot Contessa, “Back To Basics”

  • 2 sticks unsalted butter, plus an additional one tablespoon for buttering the dishes
  • 4 large eggs at room temperature
  • 2 cups sugar
  • 3/4 cups unsweetened cocoa powder (I used Ghirardelli Natural Cocoa Powder)
  • 1/2 cup all-purpose flour
  • seeds scraped from one vanilla bean*
  • 1 tablespoon framboise liqueur (optional, but I chose instead to use a coffee liqueur similar to Kahlua)
  1. Preheat the oven to 325 degrees.
  2. Butter an oval (9x12x2-inch) gratin dish or ramekins with one tablespoon of the butter.
  3. Melt the butter in a microwave oven if you have one, and set it aside to cool.
  4. In the bowl of a stand mixer fitted with the paddle attachment, cream the sugar and the eggs on medium speed until they become thick and very light yellow, about 5 to 10 minutes.
  5. While the sugar and egg mixture is being creamed, sift together the flour and the cocoa powder. I don’t have a sifter so I poured the cocoa powder and flour through a fine mesh sieve placed on top of a small bowl.
  6. After the sugar and egg mixture is ready, reduce the speed to low and add the vanilla seeds, then pour in the cocoa powder and flour mixture. Mix until just combined. Now, pour in the cooled butter and mix until just combined.
  7. The pudding bakes in a “bain marie” or water bath, so you’ll need a rectangular baking pan large enough to hold the dish or ramekins that you’ll bake the pudding in. Pour the pudding mixture into the oval baking dish (or ramekins if you are using them) and place them into the larger rectangular baking pan. If using ramekins, fill them about 2/3 full so that when they bake, they won’t rise over the top of the dish. Pour enough hot tap water into the larger baking pan until the water comes halfway up the sides of the oval dish or ramekins. Place in the oven and bake for exactly one hour. A cake tester inserted 2 inches from the sides will be almost clean, but the center will appear undone. Remove the pudding from the oven and allow it to cool. Once the pudding cools the outside edges and top of the pudding will be crackly and collapse and the center will be soft and gooey!

*A note about scraping the seeds from the vanilla beans.  This is much harder to do than it looks on television!  Take a sharp knife and carefully slice the bean down the center to open the bean pod.  Then use the point of the knife to scrape out the seeds.  I will likely use vanilla bean paste for this recipe in the future, because it’s so easy to work with and the flavor is amazing!  One tablespoon of vanilla bean paste equals one vanilla bean.

IMG_0352

IMG_0364

Hope you’re having a wonderful Valentine’s Day!

Cocktail of the Week: Classic Gin Martinez

For this week’s cocktail, we are going old school.  The Martinez is a classic 19th century cocktail comprised of four ingredients that should be included in any well-stocked home bar:  gin, sweet vermouth, maraschino liqueur and orange bitters.  The Martinez is a drink that begs to be savored, preferably in a darkened room festooned with lots of velvet and with a bluesy refrain playing in the background.  There are no frills here–no sugared rims, no floating flowers, just refinement and simplicity in a glass!  I was inspired to make this drink after seeing the recipe on Food52 and it is remarkably simple. I used Hayman’s Old Tom gin, Martini & Rossi sweet vermouth, Christiani Maraschino and Scrappy’s Orange Bitters.

Drink_Nuts-2

Photo edits done by my friend, Viana de Léon

Gin Martinez

  • Servings: 1
  • Difficulty: easy
  • Print

  • 2 ounces gin, preferaby Hayman’s Old Tom Gin
  • 1 ounce sweet vermouth
  • 1 bar spoon of maraschino liqueur
  • 2 dashes orange bitters
  • 1 twist of orange

Combine all of the ingredients except for the orange twist in a mixing glass filled with ice. Stir until chilled, then strain into a coupe glass. With a vegetable peeler or zester, remove a strip of zest from an orange or lemon. Twist the peel over the drink to allow the oils from the citrus to fall into the glass.

Now, go put on some good music and put your feet up for a while!  Cheers!

IMG_0331

Valentine’s Day Shrimp and Grits with Broccoli Rabe and Pancetta

IMG_0343

Psst…!  I don’t wish to alarm you, but Valentine’s Day is right around the corner!  Now, before you panic and grab your phone to try and make a dinner reservation, allow me give you a better option:  a totally fussy, outright gourmet restaurant-worthy dinner lovingly prepared in your own kitchen!  I don’t know about you, but I think that a home-cooked dinner beats going out to an overpriced, crowded restaurant any day!  First and foremost, I will warn you that this recipe will take some extra time and a few steps.  You will dirty not one, but a few pots and pans. After you’re done, your kitchen will likely look like a tornado hit it, and for this, I apologize. But, this is a special meal, and I promise you, it will be so delicious, your sweetie will happily volunteer to do the dishes for you!  Plus, no long wait times, overwhelmed servers and outrageously priced prix fixe menus! I think it’s a win-win!

This recipe is a take on a traditional Southern classic – shrimp and grits, but with a bit of an Italian twist!  Sweet, succulent shrimp are cooked with smoky pancetta, perched atop a bed of pungent broccoli rabe and nestled on a foundation of creamy, cheesy polenta! Broccoli rabe, also called rapini, can be difficult to find sometimes, so when it’s in season (like right now), I grab it!  It looks similar to broccolini, but has more of a bitter bite, very similar to its cousin, turnip greens.  I happened to find some at Whole Foods Market, but if it’s not available in your area, Swiss chard would make a wonderful substitute in this dish.  There are three components to this dish and they are all cooked separately and assembled at the end.  The broccoli rabe is blanched first to remove some of it’s characteristic bitterness, then sautéed with onions, garlic and red chili flakes. The polenta cooks slowly and gently in chicken stock flavored with thyme and rosemary and finished off with sharp cheddar and Parmigiano-Reggiano cheeses.  The shrimp cooks very quickly in olive oil and pancetta and is finished with a lemon-butter sauce.  So, if you’re with me, lets get started! For the sake of timing, boil the water for the broccoli rabe first, then start on the polenta. The shrimp is the very last step.

IMG_0291

IMG_0299

Broccoli rabe, onions, garlic, red chili flake

IMG_0301

Vegetables are chopped finely after they are cooked

Shrimp and Grits with Broccoli Rabe and Pancetta

  • Servings: 2-3
  • Difficulty: fussy but not difficult!
  • Print

For the Polenta:

  • 4 cups chicken stock
  • 1 cup polenta or stone ground white or yellow grits
  • Sprig of fresh thyme, leaves removed and minced
  • Sprig of fresh rosemary, minced
  • pinch of salt
  • 1 tablespoon butter
  • 1/3 cup sharp cheddar cheese
  • 1/4 cup grated Parmigiano-Reggiano or grated Parmesan cheese
  1. In a non-stick saucepan, bring the chicken stock and herbs and salt to a boil.
  2. Slowly whisk in the polenta and allow it to return to a boil while continuing to whisk. Reduce the heat to low and continue to cook, stirring occasionally, for approximately 30 minutes.
  3. Add the butter and cheeses to the polenta and whisk to combine. Remove from the heat, cover and set aside.

For the Broccoli Rabe (Rapini):

  • 1 bunch of broccoli rabe (rapini)
  • 4 cloves of garlic, sliced
  • 1/2 large sweet onion, diced
  • 3/4 teaspoon red chili flake
  • 1/4 cup chicken stock
  • 3/4 teaspoon Maldon sea salt
  • olive oil
  1. Wash the broccoli rabe thoroughly in a sink of cold water and pick off any yellow or wilted leaves. Cut off the bottom third of each bunch and discard. Bring a pot of well-salted (add 1 1/2 tablespoons of salt) water to a boil. Fill another bowl with ice cubes and water and set aside. Add the rapini to the boiling water and cook for one minute–set a timer! When the minute is over, remove the rapini with tongs and immediately plunge into the ice water. This stops the cooking process. After the rapini cools, drain it in a colander and roughly chop each bunch into 3 or 4 pieces.
  2. Pour one tablespoon of olive oil into a frying pan over medium heat. Add the onions and garlic and sauté until the onions become translucent, about 5 minutes. Add the broccoli rabe, the chili flakes, salt and the chicken stock and sauté for 15 minutes or until there is no chicken stock left in the pan. Dump the vegetables onto a cutting board and with a large knife, finely chop the vegetables. Place the vegetables back into the pan and set them in a warm spot–inside an oven heated to 170 degrees is perfect.

*If you are not using broccoli rabe and are substituting Swiss chard, you do not need to blanch it. Chop the stems separately and add them to the pan with the onions and garlic. Then add the leaves (roughly chopped) and sauté for 15 minutes. Proceed with the remainder of the directions for the vegetables.

For the shrimp:

  • 12 large raw shrimp, peeled and deveined
  • 2.5 ounces diced pancetta
  • 2 lemons, juiced
  • 3 scallions, green tops, sliced
  • 2 sprigs parsley, chopped
  • 2 tablespoons butter
  • fresh ground black pepper
  • sea salt
  • olive oil
  1. In a cold sauté pan, add a drizzle of olive oil and the pancetta, then over medium heat, cook the pancetta until the fat renders. Remove the pancetta and set it aside, leaving the fat in the pan.
  2. Lightly season the shrimp with salt and pepper and add them to the hot pan. Cook the shrimp for about one minute on each side, until the shrimp turns pink. Remove the shrimp, setting it aside with the cooked pancetta.
  3. Add the butter to the pan and after it melts, add the parsley, green onion and lemon juice. Stir quickly to combine, then return the reserved shrimp and pancetta to the pan. Toss the shrimp to evenly coat it with the pan sauce.

To serve, spoon the polenta into a bowl or plate. Top the polenta with a generous spoonful of the broccoli rabe mixture, then arrange the shrimp on the broccoli rabe. Spoon the sauce over the top and serve to rave reviews!

IMG_0342

IMG_0349

IMG_0353

Chinese New Year & Cucumber-Enoki Mushroom Salad

IMG_0315

Last weekend marked a Trifecta of Celebratory Celebrations:  Chinese New Year followed by The Husband’s birthday, which landed squarely on top of Superbowl Sunday!  Oh, and Groundhog Day, too!  Shoot. Now it’s a Quadrant? Quadrifecta?  Anyway, there was a lot going on last weekend and all of it was surrounded by delicious things to eat!

On Friday, the first day of the Year of the Horse, we ventured into Chinatown (yes, Las Vegas has a Chinatown, and a good one at that!) for Chinese soup dumplings, or Xiao Long Bao.  Now, if you’ve never had them before, let me tell you, they are amazing little feats of culinary engineering!  These little dumplings are traditionally filled with pork and a little gelatinized broth encased in a bun.  When the buns are steamed, the gelatinized broth melts and becomes like soup, so that when you bite into the delicate bun, you are treated to a steaming hot burst of soup and meat!  Delicious!  Actually, I’m not even sure why I’m getting you all excited about soup dumplings because we never even got to have any!  Because of the holiday, the restaurant was completely out of Xiao Long Bao…which if you ask me, is a little bit like Pizza Hut running out of pizza!   Despite the fact that we didn’t get to have our celebratory bao, we had a great meal and I’m glad we didn’t follow our first instinct to find another restaurant!

Look at this amazing spread!

Look at this amazing spread!

One of the dishes we were served was a cucumber and enoki mushroom salad that I have been craving ever since!  It was crisp and refreshing and so simple that I just knew I had to make it at home! Julienned cucumbers and enoki mushrooms married in a sweet and sour dressing made of rice wine vinegar, mirin and sugar.  To that basic combination I added crisp radish, cilantro and mint and a pinch of red chili flake (I cannot resist the spicy stuff!). Enoki mushrooms are easily found in your local Asian supermarket, but I found these at Whole Foods Market for a whopping 99 cents!  Did you know that there was anything at Whole Foods for 99 cents?  Me either!

Preparing the salad is simple.  Having a julienne peeler makes preparing the cucumber easier, but it’s not necessary.  Simply peel the skin from the cucumber, scoop out the seeds with a spoon and slice the cucumber vertically into thin matchsticks.  If you don’t wish to be so fussy, you can slice it crosswise into half-moons.  For the radish, I sliced them into rounds using a mandoline, then sliced the rounds into matchsticks.  The dressing is equally simple and you can make adjustments as you like.  If you like a sweeter dressing, add additional sugar. If you like an extra kick of spice, add a bit of red chili flake!

IMG_0295

Cucumber Enoki Mushroom Salad

  • Servings: 4
  • Difficulty: easy
  • Print

  • 2 large cucumbers
  • 4 radishes
  • 1 package Enoki mushrooms, cleaned and separated
  • 2 tablespoons cilantro leaves, roughly chopped
  • 1 tablespoon fresh mint leaves, finely chopped

For the dressing:

  • 1/4 cup rice wine vinegar
  • 1 tablespoon aji-mirin (sweet rice wine)
  • 1 tablespoon water
  • 2 teaspoons white sugar
  • 1/2 teaspoon kosher salt
  • pinch of red pepper flake, if desired
  1. Thinly slice or julienne the cucumbers and the radishes and add them to a medium sized bowl. Rinse the Enoki mushrooms, then cut off the ends and gently separate the mushrooms. Chop them into 2 inch pieces and add them to the cucumbers and radishes. Add the chopped cilantro and mint to the bowl. Gently mix the vegetables with your hands.
  2. In a separate small bowl, mix the ingredients for the dressing and whisk until the sugar is completely dissolved. Pour the dressing over the salad and allow the salad to marinate in the dressing for 30 minutes to an hour.  Once or twice, stir the mixture to redistribute the dressing.
  3. Before serving, stir one final time and enjoy!

IMG_0296

IMG_0303

IMG_0317

Gung Hay Fat Choy! (Happy New Year)

Downtown Las Vegas Pub Crawl!

My stove has been broken since Saturday and according to the repairman, it’s going to remain broken for the remainder of the week!  I had the faintest glimmer of hope that it would be fixed today, but of course, there were parts that had to be ordered from Timbuktu.  I suppose I should be grateful that Timbuktu has rush delivery; and really I am…but I’m honestly feeling very out-of-sorts right now!  I tell you, nothing irks me more than things being broken, undone or under construction at home–not to mention being really tired of getting takeout! So, in lieu of a recipe, I wanted to show you what I got up to this past weekend: I went on my first Downtown Pub Crawl!

I will be the first person to confess that I have not spent nearly enough time exploring the revitalization projects going on in Downtown Las Vegas!   I’ve been to the Smith Center for the Performing Arts, which is an awesome and wonderful addition to our city.  I’ve also spent time in the Downtown3rd area, having dined at the Triple George Grill numerous times.  But,  until last weekend, I had not experienced Fremont East!  I felt like a tourist in my own town!  The Downtown area has been undergoing a bit of a renaissance thanks to the Downtown Project, spearheaded by Zappos CEO, Tony Hsieh. I admit, I was pleasantly surprised and a lot thrilled at the atmosphere down there!

1493133_730712670295750_75056370_n

We started the evening at Atomic Liquors located at 917 Fremont Street. Atomic Liquors is the oldest drinking establishment in Las Vegas and I was told that during the 1950s, people would enjoy a cocktail on the rooftop while watching the atomic blasts at the nuclear test site!  There we enjoyed a very well-crafted Tom Collins and a Sidecar.  You know you have found a good watering hole when the bartender can make a good, classic cocktail.

1531656_730712966962387_1907943410_o

IMG_0706

Classic Sidecar at Atomic Liquors

From there, we walked a few blocks to the recently opened Container Park where we had a couple of cocktails at The Boozery.   I had a “Dark and Stormy” which consisted of dark rum, ginger beer and lime!  I’m definitely going to try to replicate that one at home!   By this time, I was starting require a little more food in my belly, so we ventured over to Chef Kerry Simon’s Pork & Beans for “The World’s Best Hot Dog” and some thick and spicy chili!

IMG_2671

We were greeted by this huge fireball spitting Praying Mantis sculpture!

IMG_2675

Container Park

Shipping containers house all of the shops and dining spots (hence the name Container Park), so the spaces are cozy!

The next stop was the Vanguard Lounge, which that evening wasn’t crazy crowded, so it was a nice space to kick back for a few minutes.  After that we headed over to the piano bar Don’t Tell Mama, where somehow, I ended up onstage singing “Cups”!  See what happens when you drink?

1540418_730713743628976_620372605_o

Our last stop of the evening was the Downtown Cocktail Room, which was downright swanky and sophisticated.  The mixologists made me a thoughtfully crafted cocktail that I cannot find on their menu, but it was frothy and spicy and I suspect it contained ginger and possibly egg white–it was fantastic!  One thing I really enjoyed about the “DCR” is that it was very spacious, with comfortable chairs and couches, and the music wasn’t so loud that you couldn’t hear a conversation.  To me, that’s a perfect nightspot!

So, if you’re visiting Las Vegas or if you live here, be sure to check out these great spots Downtown–you’ll be glad you did!

Special thanks to my good friend, Victor Rodriguez of Eurie Creative Design Firm, who organized and hosted this event.

Spicy Blood Orange Margarita

IMG_0294

You might be wondering why I’m having a margarita on National Pie Day.  Well, other than that fact that any day is a good day for a margarita, it’s mainly because my attempt at making pie crust this week drove me to drink.  Fresh from my stellar artisan bread success over the weekend, my starry-eyed self ran to Homegoods on Monday and bought a bundt cake pan and a tart pan (the two piece type that has a removable bottom).   I planned to break in that tart pan by making an amazing quiche from scratch with a blind-baked homemade crust.   I raced home from work and immediately began making a series of rookie mistakes.  First off, I didn’t thoroughly read the recipe all the way through.  I had assumed that the pie crust dough would be the same as a dough I had experimented with over the summer, so I didn’t notice that the recipe I had chosen required a two hour rest period in the refrigerator!  No matter, I thought, I’ll just look up another recipe.  The second recipe I found also required a two hour rest!  So, being solution oriented and not wanting to eat dinner at 9 p.m., I decided that 30 minutes in the freezer would do the trick…and it did…sort of.  The dough was nice and chilled, but it was also hard as a brick and it took a heck of a lot more muscle to roll it out!  Not to mention, it kept breaking which meant I had to patch it–so not pretty.

I placed the dough in the tart pan and trimmed it flush to the top of the pan–another mistake as I would soon find out.  I placed a sheet of parchment over the top and filled the pan with a pound of dried beans in order to weigh it down.  After 25 minutes, I took a look and the crust had shrunken far below the top of the pan and had pulled away from the edges!  I’m pretty sure this was because I trimmed it too close to the top edge.  Not wanting to risk breaking the now very fragile crust, I attempted to remove the parchment and beans without taking the tart pan out of the oven.  I saw the error of my ways unfold in slow motion as a full pound of blazing, hot beans  exploded from my hands and scattered all over the kitchen!  And then, of course, the cats rushed in to investigate and bat the beans around.

The shrunken crust didn’t hold the quiche filling very well and the filling poured over the top of the crust and leaked out of the bottom of pan.  Oh! I almost forgot: I had scooped up the beans and put them in an unsealed plastic baggie. You know where this is going, right?  The husband came in, picked up the bag, and promptly spilled the beans all over the kitchen AGAIN!  At least they weren’t hot that time.

In short, I ended the evening exhausted, covered in flour and vowing to never make a crust from scratch on a weeknight again!  After all that, at least it tasted good!

So, with that…it’s cocktail time!  And unlike pie crust, you can make a cocktail in less than 10 minutes–on a weeknight! Blood oranges are in season right now, so I hope that you will run, not walk, to your local grocery store or farmer’s market and get them while they are available! This cocktail was inspired by White on Rice Couple’s Blood Orange Margarita with Bitters.  I’ve adapted the recipe to make it a touch less sweet and with a splash more tequila, because that’s what I needed after the week I’ve had! I also muddled in a bit of cayenne pepper for a spicy kick! I love it when a drink makes my lips tingle!

IMG_0286

Spicy Blood Orange Margarita

  • Servings: 1
  • Difficulty: easy
  • Print

Adapted from White on Rice Couple, Blood Orange Margarita Cocktail with Bitters

For each drink you will need:

  • 2 ounces freshly squeezed blood orange juice (approximately 1 to 2 oranges depending how juicy they are)
  • 1 1/2 ounces Tequila Reposada
  • 3/4 ounce freshly squeezed lime juice
  • 1/2 ounce simple syrup*
  • 2 dashes orange bitters (optional, but adds depth)
  • 1/4 piece of hot chili pepper (I used a cayenne pepper, but serrano chili would also be fantastic)
  • sea salt placed on a saucer for rimming the glass
  • ice
  1. Fill the margarita glass with ice and set aside or in the alternate, place the glass in the freezer for a few minutes.
  2. Muddle the chili pepper in the bottom of the cocktail shaker. Add the tequila, blood orange juice, lime juice, simple syrup and bitters to the shaker and then add about a cup of ice.
  3. Dump the ice from the margarita glass. Wet the rim of the glass with a lime wedge and roll the edge over the sea salt.
  4. Now, give the shaker a few good shakes, then strain the cocktail into the salted margarita glass. Garnish with a twist of orange peel!

*To make simple syrup, slowly dissolve 1 cup of sugar into one cup of water in a small saucepan over medium heat. Cool and store in the refrigerator.

IMG_0288

Cheers!

Mussels with Fennel, Italian Sausage and Créme Fraiche plus Rosemary Lemon Bread!

IMG_0309

I should be telling you about the steaming pot of mussels I cooked up yesterday. I should be telling you about the tender, sweet shellfish swimming in a broth of white wine, tangy créme fraiche and fennel.  I should tell you about the little bits of hot italian sausage hiding in the mussel shells, like little yummy gifts waiting to be discovered.  But, what is currently hijacking my brain right now is the crusty loaf of lemon rosemary bread that I used to dip into that tangy broth, sponging up all that goodness!  That crusty, crackly crunchy shell hid an interior so creamy and custardy (hey that’s a lot of c-words in one sentence!) that I just need to take a moment to reflect on the wonder that is home-baked bread.  

IMG_0306

Ok, now that I’ve gotten that out of my system, I can go back to telling you about those mussels!  

Cooking mussels in a broth of white wine is as classic as it comes, and this recipe takes that basic dish and amps it up with a bit of red chili flake, hot Italian sausage and fennel.  This is one of the first mussel recipes I learned to make and the original recipe is found in Jamie Oliver’s “Cook with Jamie”.  Not too long ago, I found a similar recipe on the Food52 site that added Italian sausage to the mix.  So, I have adapted the original recipe just a touch and came up with a recipe that blends the best of both versions. When you purchase mussels, make sure you get ones that are heavy and completely closed and smell fresh, like the ocean. They should not smell like ammonia or overly fishy. If they do, then they are not fresh. Bring your mussels home and immediately put them in a bowl and cover them with ice or a combination of ice and water. Whatever you do, take them out of the bag that you purchased them in and cook them as soon as possible. When you are ready to cook them, clean them under a stream of running water cleaning off any bits of dirt and beard that may remain on them. I used a pair of needle-nosed pliers to pull the beards off. The mussels I purchased were mostly de-bearded, but I still had to clean them up a bit.

Mussels with Fennel, Italian Sausage and Créme Fraiche

  • Servings: 2 as a main dish
  • Difficulty: easy
  • Print

Adapted from:  Jamie Oliver, “Cooking with Jamie”

Ingredients:

  • 2 pounds of cleaned mussels
  • 1 large fennel bulb – sliced thin (fronds reserved)
  • 1 1/2 cups white wine
  • 1 teaspoon red chili flakes
  • 3 cloves garlic, thinly sliced
  • 1 large shallot thinly sliced
  • 1/4 pound hot Italian sausage (one link, casing removed)
  • 3 ounces créme fraiche
  • pinch of saffron in 2 tablespoons of hot water
  • olive oil
  • salt and pepper to taste
  1. In a large skillet or saucepan, brown the Italian sausage. Remove the sausage and set aside.
  2. Add 2 tablespoons of extra virgin olive oil to the same pan and sauté the fennel, garlic and shallots for about 10 minutes or until the vegetables begin to caramelize. Remove the vegetables and set aside along with the sausage.
  3. On medium heat, add the saffron with the 2 tablespoons of water, the red chili flakes and the white wine. Bring to a boil, then add the mussels to the pan. Cover the pan and give the pan a good shake and continue cooking with the lid on. Check the mussels after 2 minutes. Depending on the size of the mussels they should begin to open in about 2 to 3 minutes. Discard any mussels that haven’t opened after 4 minutes of cooking. When all of the mussels have opened, remove the mussels from the pan (leaving the broth in the pan) and place them in a large bowl.
  4. Add the sausage and vegetables to the pan with the broth along with the créme fraiche and cook for 5 minutes. Taste the broth and add salt and pepper if needed. When the broth is seasoned to your liking, pour this broth over the mussels and serve immediately.

IMG_0287

IMG_0311

So, onto that amazing bread!  Full disclosure: this is not my first time making bread, but it was my first time making this particular recipe and technique.  This bread is incredibly easy to make, but it takes a bit of time, so you can’t just decide on a whim to make it the same day.  This bread rises for 12 to 18 hours on its initial rise and then an additional 2 hours on baking day, but let me tell you the results are worth the wait!  There is very little hands-on activity–patience and time is what you need. A lidded cast iron Dutch oven is the perfect implement with which to bake this bread. I started this bread around 8 pm and baked it the next day at 3 pm. Also, if your house is on the chilly side, it may take longer on the initial rise.  The following morning, when it looked as if if hadn’t risen, I placed it in a slightly warmed (80 degree) oven for 4 hours and that did the trick. I used my stand mixer fitted with the paddle attachment to combine all of the ingredients and then allowed it to rest overnight in the mixing bowl.

Lemon Rosemary Bread

  • Servings: 1 and 1/2 pound loaf
  • Difficulty: easy
  • Print

Credit: Williams-Sonoma which was adapted from Sullivan Street Bakery and Mark Bittman’s “The Secret of Great Bread: Let Time do the Work”

Ingredients:

  • 3 cups all-purpose flour
  • 1/4 teaspoon active yeast
  • 1 3/4 teaspoon kosher salt
  • 2 teaspoons lemon zest
  • 2 teaspoon finely chopped rosemary
  • 1 1/3 cups water
  • cornmeal and extra flour for dusting
  1. In a large bowl or in the bowl of a stand mixer, combine the flour, yeast, salt, lemon zest and rosemary. With the mixer on the lowest speed, slowly add 1 1/3 cups of water and mix until the ingredients are combined. The dough will look shaggy and will be very sticky. Cover the bowl with plastic wrap and place in a warm spot (around 70 degrees) for 12 to 18 hours or until the dough is dotted with small bubbles.
  2. Turn the dough out onto a lightly floured surface and sprinkle the surface with flour. Fold the dough onto itself. Imagine it like folding a towel. Fold in half lengthwise, then fold in half again cross-wise. Lightly cover the dough with plastic wrap and allow it to rest for 15 minutes.
  3. Now, quickly shape the dough into a ball by placing both hands on the dough and quickly pulling it towards you. Twist the dough a half-turn and pull it towards you again. Repeat until the dough is in a ball shape.
  4. Generously sprinkle a clean kitchen towel (not one made of terry cloth) with corn meal and place the dough ball (seam side down) on top of the corn meal. Sprinkle the top of the dough with additional flour and cover the dough with another clean kitchen towel. Allow the dough to rise for an additional 2 hours.
  5. About a half hour before the dough has completed its second rise, preheat your oven to 450 degrees and place the lidded cast iron Dutch oven inside. When the dough has completed its rise, remove the pot from the oven and remove the lid. Remove the top towel from the dough and slide your hand under the bottom towel. Plop the dough into the pot (seam side up), quickly place the lid on it and put it back in the hot oven.
  6. Bake for 30 minutes with the lid on. Then remove the lid and bake for 15 additional minutes. Remove the pot from the oven and allow the bread to rest for about 10 minutes. Then remove the bread and allow it to cool on a rack (or more realistically, tear into it while it’s still piping hot and shove it into your mouth).

IMG_0303