Latest Posts

How to Roast a Whole Chicken

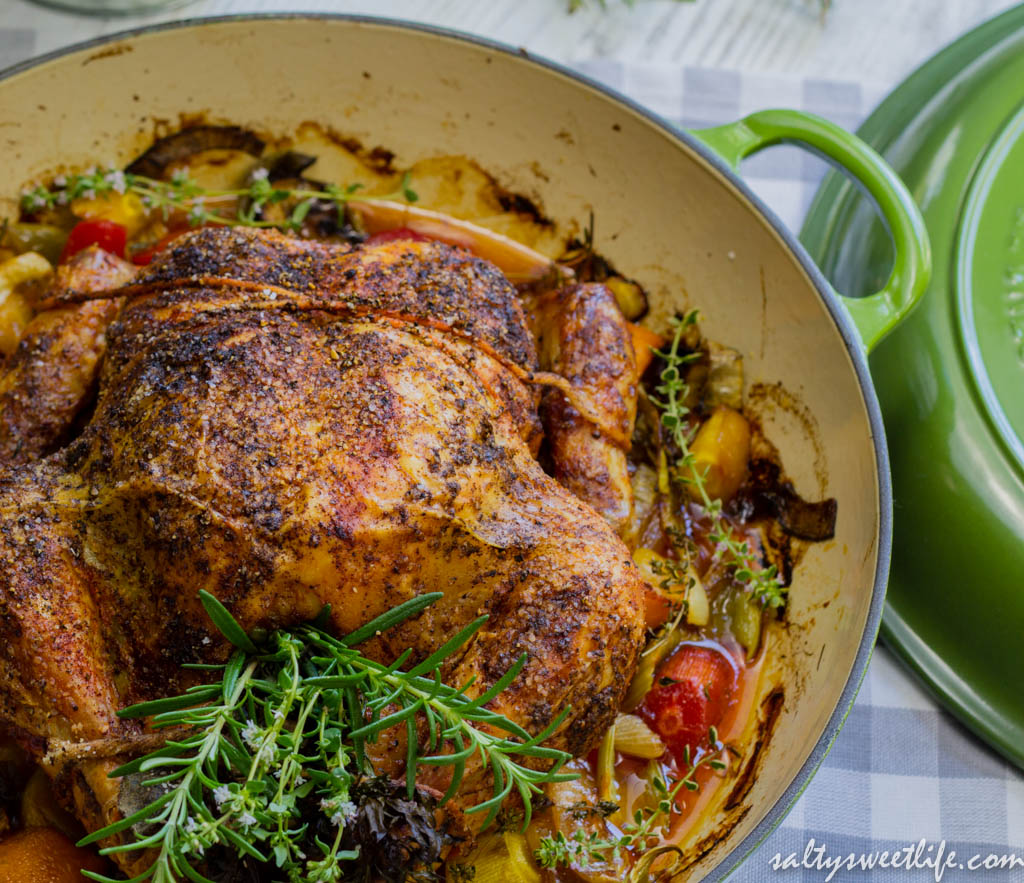
It’s a little bit odd that this is the first time I’ve written about roasted chicken. I make it when company comes over. I make it when the Husband comes home from a business trip (it’s his favorite)! I make it for New Year’s Day, then I make it again for Easter. Really, is there anything more satisfying than a perfectly roasted whole chicken?  Golden brown, crispy skin with a perfectly juicy interior; it is comfort food at it’s finest, yet it can be a perfectly elegant centerpiece of a “fancy” dinner. Seriously, bringing a well-roasted, plump chicken to the table is a beautiful thing. It’s like the Thanksgiving Turkey without all the anxiety! The Husband brags about this chicken to his friends and colleagues, and I admit, it makes me smile…a lot! There’s no sweeter feeling than when someone you love enjoys something you’ve made so much!

roastedchicken-7

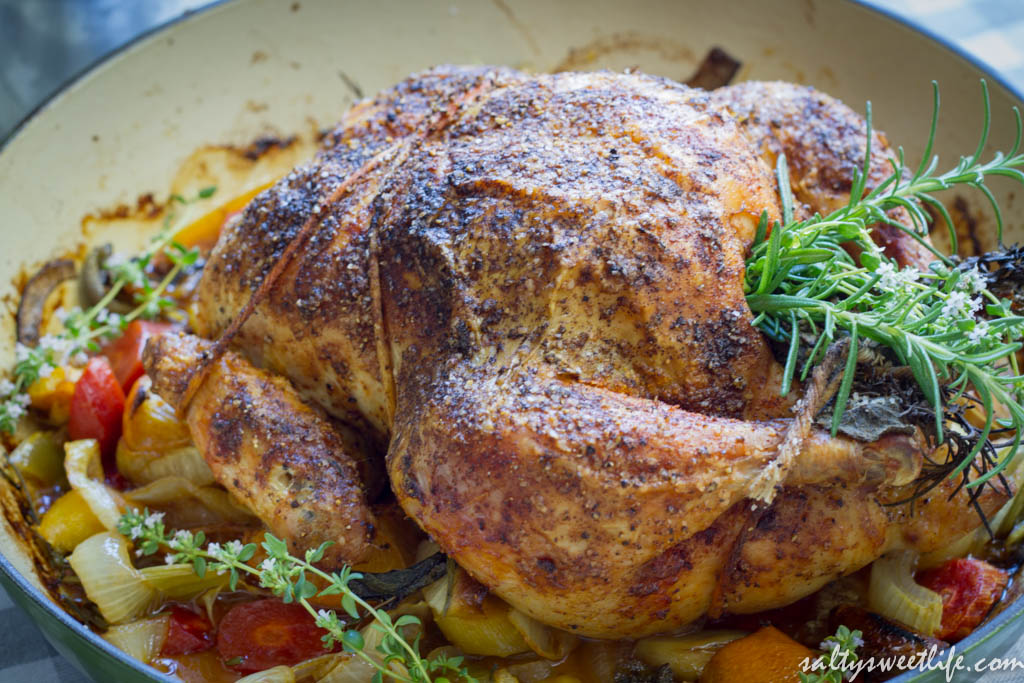
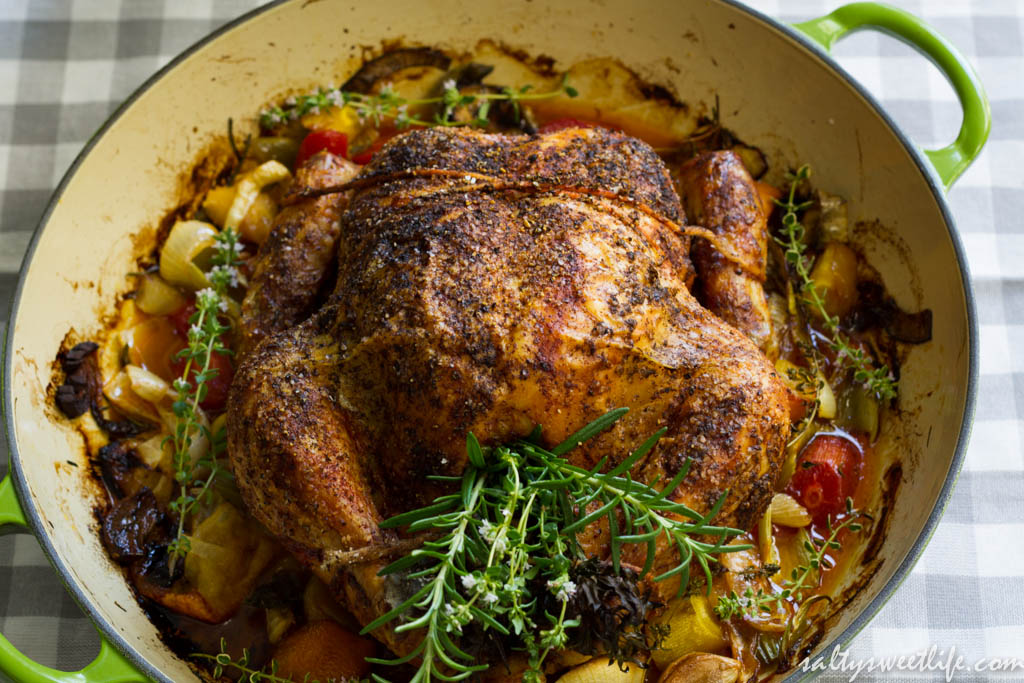
I learned the method of cooking this chicken from a Barefoot Contessa episode many years ago and I’ve made it so many times I could make it in my sleep! The method is simple and the most complicated part of it is assembling all the ingredients. Start with the best quality whole chicken that you can afford and load it full of aromatics–fresh herbs, garlic, onions, lemons. Then season it until you think you can’t possibly add more seasoning and then season it some more! Truly, the chicken can take it and I have never over-seasoned a roasted chicken. This chicken roasts uncovered for 90 minutes in a fairly hot oven. The high temperature sears the skin of the chicken and traps all the juices inside. You don’t need to baste it or fuss with it at all once it goes into the oven. If you absolutely must do something (and I get it, I get antsy, too) around the 45 minute mark, you can rotate the roasting pan so that the chicken cooks more evenly and give the vegetables a quick stir. Then go have a glass of wine and put your feet up (or wash the dishes, whatever you prefer)!

roastedchicken-9

Here are 5 important tips on how to get a perfectly roasted chicken every single time:

  1. Start with a nice, plump chicken. A 4 to 6 pound chicken is the perfect size for this cooking method. I always use a “natural” bird and not a pre-brined bird because I like to be in control of the seasoning.
  2. Before roasting the chicken, allow it to come to room temperature and pat the chicken completely dry inside and out before seasoning it. Dry skin is crispy skin!
  3. Don’t be afraid of seasoning!  Use loads of fresh herbs in and around the chicken and be liberal with dry seasoning. Don’t forget to season the inside of the bird and around the neck as well.  Every bit counts and you want to have a well-seasoned, flavorful bird.
  4. Don’t pierce the chicken while it’s cooking or the juices will run out and you’ll end up with a dry bird.
  5. And finally, don’t dare cut into that chicken until you have let it rest for at least 20 minutes!


So, now that we have the important stuff covered, let’s start roasting!

roastedchicken-2

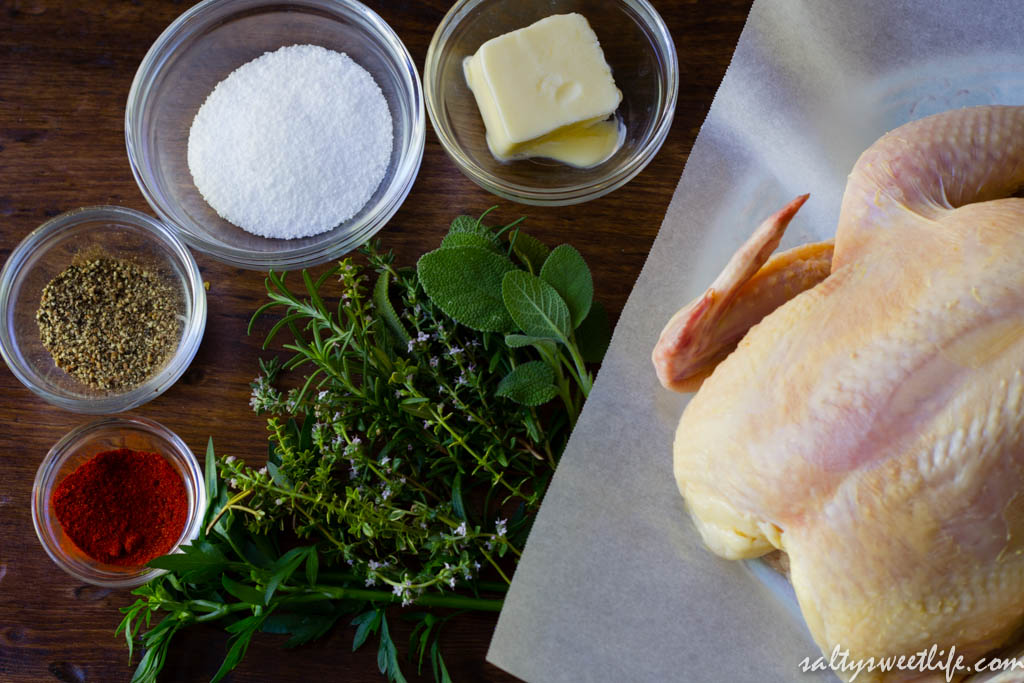
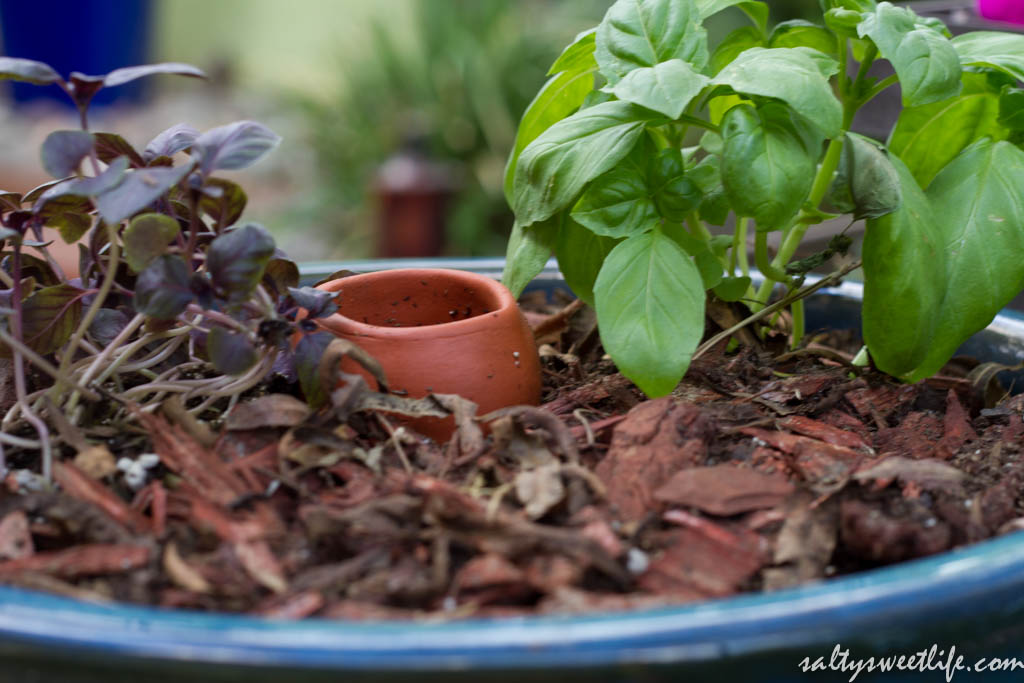
Mise en Place – I grew all these herbs myself!

roastedchicken-3

roastedchicken-4

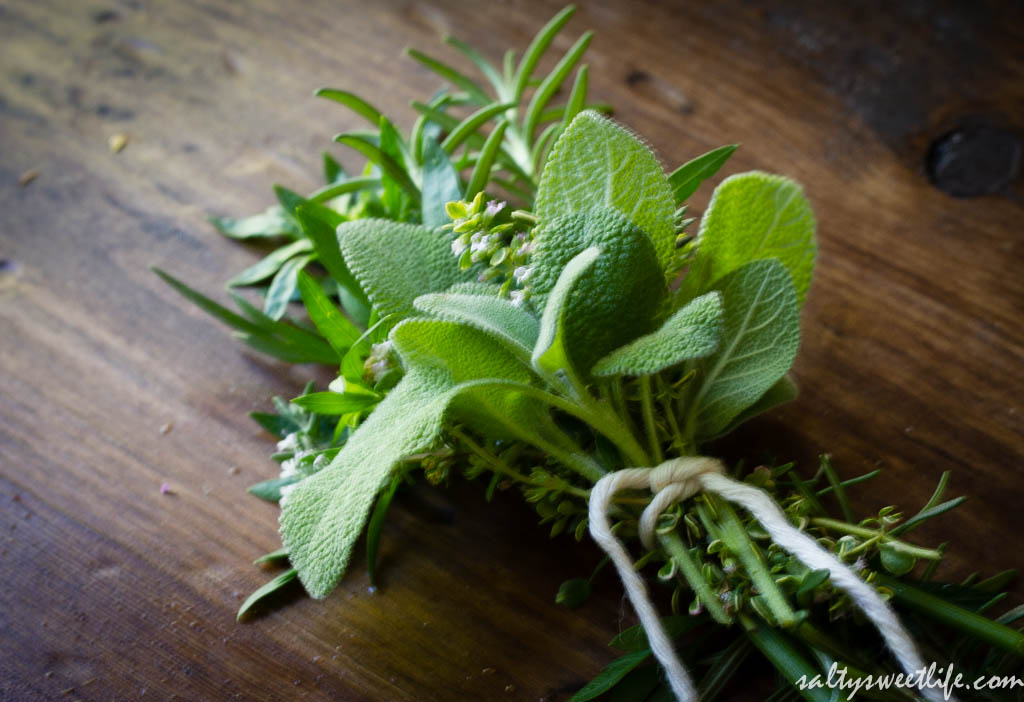
Bouquet garni: a little bouquet of sage, thyme, rosemary, parsley tied together with butcher’s twine

roastedchicken-5

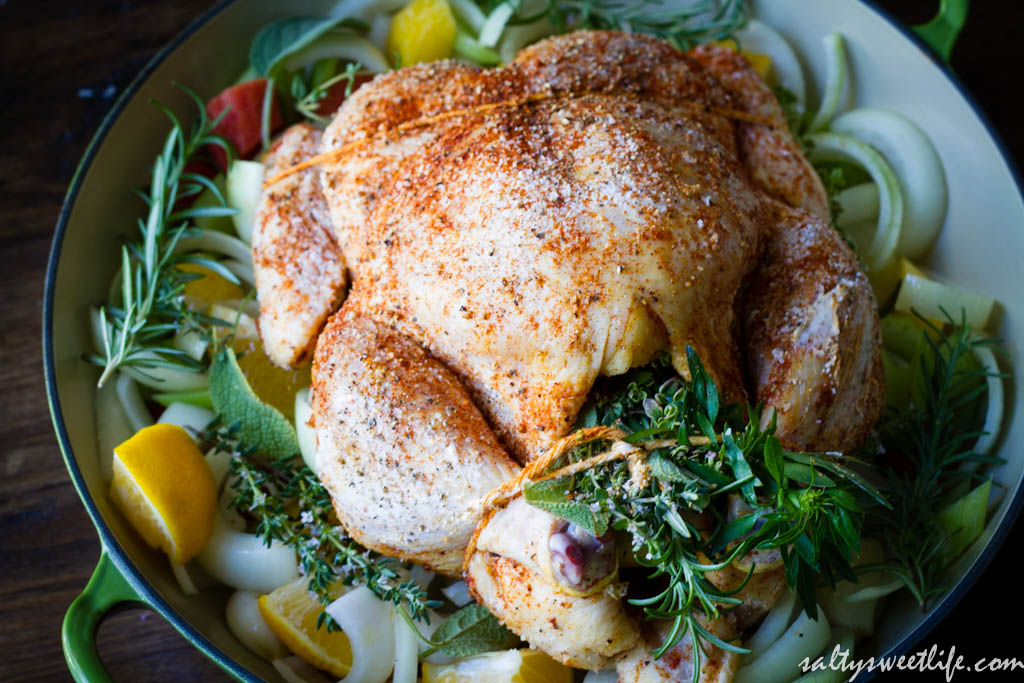
Chicken on its way into the oven

Perfect Roast Chicken

  • Servings: 4-6
  • Difficulty: moderately fussy
  • Print

Inspired by Ina Garten’s “Perfect Roast Chicken”

  • 4-6 pound whole chicken
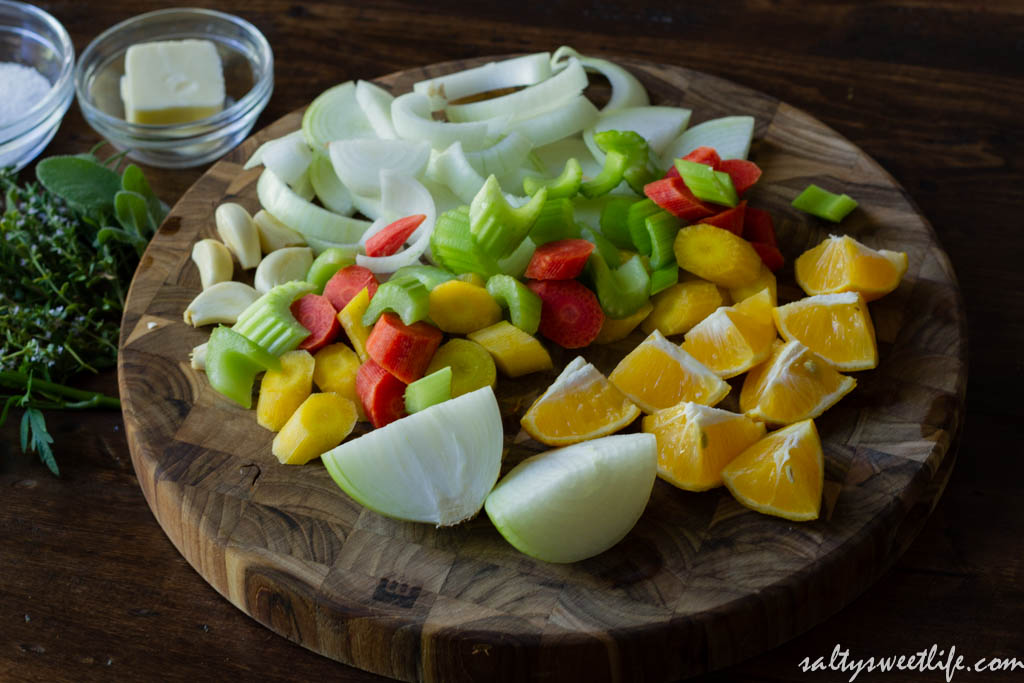
  • 2 medium onions
  • 2 lemons
  • 2 carrots
  • 2 celery stalks
  • 6 cloves garlic
  • Fresh Sage
  • Fresh Thyme
  • Fresh Rosemary
  • Fresh Parsley
  • 2 tablespoons Kosher Salt
  • 1 tablespoon Freshly Ground Black Pepper
  • 1/4 teaspoon cayenne pepper
  • 1 1/2 teaspoons smoked paprika
  • 3 tablespoons unsalted butter, softened
  • Olive oil

You will also want to have:

  • Butcher’s twine
  • parchment paper
  • Roasting pan
  • lots of paper towels for clean-up

Preheat the oven to 425 degrees

  1. Prepare the chicken by rinsing it inside and out. Remove any giblets. Now, I know that there has been recent talk about not rinsing chicken, but I still do it. I place the chicken in the sink and gently run water over it to avoid excess splashing. Dry the inside and outside of the bird with paper towels and set the bird on a sheet of parchment paper. Allow the bird to come to room temperature while you prepare the vegetables.
  2. Chop 1 1/2 onions into thick slices. Chop the carrots and celery into 1 inch pieces. Peel the garlic cloves and lightly smash them with the back of a chef’s knife. Cut one lemon into eighths.
  3. Place the seasonings into small prep bowls. Your fingers are going to get messy and you’re not going to want to touch your spice containers with messy chicken hands.
  4. Place the carrots, celery, 4 cloves of garlic, the sliced onion and the cut lemons in the bottom of the roasting pan. Drizzle a little olive oil over the vegetables and stir to coat.
  5. Generously season the inside of the chicken with salt and pepper. Rub the softened butter all over the chicken, then season the chicken liberally with the salt, then the pepper, cayenne pepper and smoked paprika. Discard any unused seasonings and butter.
  6. Cut the remaining lemon in half and place inside the cavity of the chicken. Cut the remaining 1/2 onion in half and stuff that into the cavity as well, along with the remaining two garlic cloves. Tie the sage, thyme, rosemary and parsley with a short length of twine and stuff the entire bouquet into the cavity.
  7. Tuck the wings under the chicken, then truss the chicken with a length of butcher’s twine. This is not rocket science, you are simply pulling the wings and the legs snug to the body. Place the chicken on top of the vegetables in the roasting pan. Tuck additional sprigs of thyme, rosemary and sage around the chicken.
  8. Roast for 90 minutes. After the chicken is done, allow the chicken to rest for at least 20 minutes before carving.

I hope you enjoy this chicken as much as we do!

roastedchicken-8

roastedchicken

One of these days I’ll have the husband do a carving tutorial!  After you’ve carved all the meat from the bones, save the carcass to make stock!


Quinoa and Black Bean Stuffed Poblano Peppers

There are lots of reasons that you are going to love this dish!  I love it because it’s a healthy, meatless, dish that can stand on its own, but at the same time, it can also be a great side dish for your favorite protein.  What I love most about this dish is that it is SPICY!  I love spicy food, but I didn’t want the dish to be all about the heat.  What I wanted to do was create lots of flavor to compliment that heat!  So, to do that, I tucked little bits of heat into each component, layering flavors and spice, creating an end result that won’t leave you breathing fire or reaching for the nearest glass of milk!

stuffedpoblanopeppers-8

Typically, when you see a poblano pepper, it’s in the form of a chile relleno that you find at your favorite Mexican restaurant.  The chile is stuffed with cheese, dipped in batter and deep fried.  Now, I don’t have anything against foods that are filled with cheese and deep fried, but realistically, that’s just not going to happen with any frequency around here.  So, I wanted to “healthy up” the chile relleno–stuffing it with quinoa, black beans and tomatoes, and topping it with a reasonable sprinkling of cheese.  It’s a great dish–full of protein and whole grains, it is so very filling and you won’t even miss the meat!  If you aren’t a fan of spicy food, you can still make this dish by simply omitting or decreasing the amounts of some of the more fiery ingredients.

stuffedpoblanopeppers-11

Poblano peppers are easily found at the regular grocery store, but I’ve found that they are often improperly labeled as “pasilla peppers”. They are dark green in color and shaped like an arrowhead.  They are typically a milder pepper, but the ones I made for this recipe were actually quite spicy!  I love spicy surprises!  Purchase the largest peppers you can find since that will make stuffing then that much easier.

stuffedpoblanopeppers

This dish is moderately fussy, but it’s all for a good cause!  In order to make it extra flavorful, each component is seasoned to perfection before it’s melded together as a stuffing.  The peppers are fire roasted first, which deepens their flavor and also eliminates any bitterness that you might encounter in the skin.

stuffedpoblanopeppers-3

Roasting peppers over open flame on the stovetop

The beans are seasoned with spices that are fairly common to Southwestern dishes:  Mexican oregano, chipotle chile, cumin and coriander; then all of the components are brought together with a generous squeeze of lime juice and lime zest and lots of bright, flavorful cilantro!

stuffedpoblanopeppers-6

Mexican Oregano, chipotle chile powder, cumin and coriander

stuffedpoblanopeppers-2

Seasoned Black Beans

Peppers after stuffing with quinoa and black bean mixture

Peppers after stuffing with quinoa and black bean mixture

Quinoa and Black Bean Stuffed Poblano Peppers

  • Servings: 2 as a main dish, 4 as a side dish
  • Difficulty: moderately fussy
  • Print

  • 4 large poblano peppers
  • 1/2 cup quinoa
  • 1 cup chicken or vegetable stock
  • 1 cup small tomatoes, quartered
  • 1/2 serrano chile pepper, seeds and ribs removed, minced
  • Zest and juice of one lime
  • 1 14 ounce can black beans, drained and rinsed
  • 1/2 cup chopped sweet or white onion
  • 2 cloves garlic, minced
  • 1/2 cup chopped cilantro (about a half of a bunch)
  • 1/2 teaspoon cumin
  • 1/2 teaspoon coriander
  • 1/2 teaspoon mexican oregano
  • 1/4 teaspoon chipotle chile powder
  • Feta or Cotija cheese
  • Olive oil
  • kosher salt

Preheat the oven to 400 degrees.

  1. Place the quinoa in a fine mesh sieve and rinse thoroughly with cold water. This is an important step as it rinses off the bitter saponins found naturally in the quinoa. Combine the rinsed quinoa with 1 cup of chicken or vegetable stock and 1/4 teaspoon of kosher salt in a small saucepan. Bring the mixture to a boil, then lower the heat to a simmer, cover and cook until all of the liquid is absorbed (about 15 minutes).
  2. Using tongs, roast each pepper over the hottest flame on the stove. Turn the pepper until the surface of the skin is evenly charred and bubbly. Once each pepper is blackened, place it into a paper bag and close the bag. If you don’t have a gas stove, you can place the peppers under the broiler on the highest setting. Use the tongs to turn the peppers until they are evenly roasted.
  3. Allow the peppers to cool in the paper bag. Once the peppers are cool enough to handle, use a sharp knife to scrape off the burned skin. The skin should come off easily. With the sharp point of the knife, gently make an incision in the pepper to make a pocket. Remove the seeds and set the peppers aside.
  4. In a sauté pan, heat one tablespoon of olive oil over medium heat. Add the onions and garlic and sauté for 2 minutes, until the onions become translucent. Add the oregano, cumin, coriander and chile powder to the onions and sauté for 1 minute to bloom the spices. Add the black beans, 1/4 teaspoon salt and about 1 tablespoon of chopped cilantro and stir. Remove from the heat and set aside.
  5. In a medium sized bowl, combine the cooked quinoa, seasoned black beans, tomatoes, serrano pepper, lime zest, lime juice, the remainder of the cilantro and 1/4 teaspoon salt.
  6. Spray a baking sheet with cooking spray or coat with a little olive oil. Stuff the peppers with the quinoa mixture and place each one on the baking sheet. Sprinkle each pepper with the cheese. Cover the peppers with foil and bake for 15 minutes. Remove the foil and cook for another 5 minutes.

If you want a milder dish, either decrease or omit the serrano pepper and the chipotle chile powder.  To serve, I topped the peppers with chopped avocado and cilantro and a bit of our favorite salsa!


stuffedpoblanopeppers-7

stuffedpoblanopeppers-9

stuffedpoblanopeppers-8

Seared Black Cod with Meyer Lemon and Caper Relish

blackcodmeyerlemon-2

Hello.  My name is Tracey and I have just learned to properly sear seafood.  There, I said it.  It’s a little embarrassing, given the time I’ve been cooking seafood, but that’s what it’s all about, right? Learning new and better ways of doing things!  While watching cooking shows, I would often think, wow, that’s a beautiful sear on that fish! Why doesn’t my fish look like that when I do the same thing?  Well, I finally figured it out.  I simply wasn’t leaving the fish in the pan long enough to get that nice golden sear.  I have since discovered that my sense of timing is very, very off.  For instance, when I think I’m doing something for 2 minutes, it’s actually more like 45 seconds.  I blame the digital age–it’s messing with my attention span!  Or perhaps it has something to do with the way food television is edited!  Whatever the reason, to solve this, I’ve started using the stop-watch feature on my phone to time myself.  I tried this with scallops first because I never understood why I couldn’t get that deep golden brown sear on them.  The recipe I was using said to sear the scallops on one side for 4 minutes.  4 minutes didn’t seem like a long time until I started the stop watch.  Sure enough, within a minute, I was starting to get antsy, thinking surely it was time to turn the scallops!  Turns out, in my head, 4 minutes is an interminably long time to cook a scallop!  But the recipe was spot on.  4 minutes was exactly right on the money.  Finally! A properly seared scallop that was not at all overcooked! Win!

scallops

Scallops after searing for 4 minutes

So, if you’re like me–an impatient cook, try the stop watch trick and see if that doesn’t change the way your recipes come out!  With that knowledge, let’s forge ahead with black cod!

This recipe was from The Sprouted Kitchen cookbook, by Sara Forte and Hugh Forte.  This cookbook is a fairly recent purchase and I’ve now made quite a few of the recipes and they are stellar!  Do check out their blog–it is gorgeous.  What I loved most about this dish was the Meyer Lemon and Caper Relish!  It was so delicious that I was literally eating it with a spoon!  The meyer lemons are “quick preserved” overnight in a little salt and vinegar and the following day, the rinds are soft and bursting with flavor!  This bright relish pairs so perfectly with the rich and buttery cod. I lightly adapted the recipe by using white wine vinegar instead of champagne vinegar and I also increased the amount of agave syrup upon the Husband’s recommendation.

blackcodmeyerlemon

Seared Black Cod with Meyer Lemon and Caper Relish

  • Servings: 4
  • Difficulty: easy
  • Print

Source:  Very lightly adapted from The Sprouted Kitchen Cookbook, By Sara Forte and Huge Forte

For the Relish:

  • 1 Meyer or Eureka Lemon
  • 1 teaspoon sea salt
  • 3 tablespoons white wine vinegar
  • 2 1/2 tablespoons agave syrup
  • 2 shallots, minced
  • 1/3 cup brined capers, drained, rinsed and roughly chopped
  • 3 tablespoons fresh parsley, finely chopped
  • 3 tablespoons extra-virgin olive oil

For the cod:

  • 1 1/2 pounds black cod (skin on) divided into 4 fillets
  • 1 tablespoon coconut oil
  • 2 tablespoons butter (divided)
  • salt and pepper

The lemons should be prepared the night before if possible. The original recipe states that it can be made “no fewer than 4 hours” before serving, but I went the safe route and started them the night before and they were perfect.

  1. Slice the bottom and top ends from the lemon and slice the lemon in half lengthwise. Remove the seeds, then thinly slice the lemon into half-moons. Finely dice the lemon slices and add them to a bowl along with any juices that spilled out while you were cutting them. Add the salt, vinegar, agave nectar and stir. Cover the bowl with plastic wrap and leave it at room temperature overnight (or for at least 4 hours).
  2. After the lemons have rested, stir in the capers, parsley, shallots and olive oil and set aside.
  3. Preheat the oven to 400 degrees.
  4. Using a paper towel, pat both sides of the cod dry and set it aside to come to room temperature. Season both sides of the fish with salt and freshly ground black pepper.
  5. Place the coconut oil and one tablespoon of the butter in an oven proof frying pan over medium high heat. Swirl the butter and coconut oil together as it melts. When the pan is nice and hot, place the fish skin side down in the pan, giving each piece enough room to breathe. Don’t let them touch each other! Set your timer and cook on one side for 2 minutes. Gently flip the fish onto the other side and sear for another 2 minutes. The fish should be beautiful and golden brown. Flip the fish back over so that it’s skin side down again and spoon some of the relish over each piece. The relish is wet enough that it will drip into the pan–this is a good thing! Add the second tablespoon of butter to the pan and place the pan into the oven. Cook for an additional 6 minutes (again, use that timer!) or until the middle of the fillet easily flakes with a fork.  While the fish was in the oven, I basted it a few times with the pan juices.

I can’t begin to express how delicious this was!  The cod is rich and buttery and retains a bit of coconut-ty fragrance from the coconut oil.  The relish is both tart, salty and sweet and when it hits the pan, it caramelizes beautifully. I basted the fish several times with the pan juices and it was just amazing!  I will definitely be using that relish for other varieties of fish in the future.  This one’s a keeper!

blackcodmeyerlemon-5

blackcodmeyerlemon-3


Triple Berry Overnight Refrigerator Oatmeal

refrigeratoroatmeal-4

I never miss breakfast.  I think of my weekday breakfast as my one chance to do something good for myself. A meal that has the potential to be so totally virtuous that it can cover up a multitude of lunchtime sins (in which I have been known to indulge)! During the week, I don’t need variety–I just need something relatively fast and healthy that will give me the energy to get through the morning.  In the colder months, I make oatmeal every day–the stovetop kind, dressed up with nutmeg, cinnamon, raisins, walnuts and blueberries.  I love this breakfast. But once it starts getting towards the warmer months, cold cereal is usually on the menu.  In the summer, I make a mega-mix of very grown-up cereal:  Shredded Wheat, Grape-Nuts, raw rolled oats, raisins and walnuts.  It’s a pretty intense amount of fiber, but that’s how you know you’ve grown up–you start thinking about things like fiber!

refrigeratoroatmeal

I had been pretty satisfied by my winter/summer weekday breakfast lineup, but then I started seeing this recipe from The Yummy Life for “Overnight No-Cook Refrigerator Oatmeal” circulating on the internet.  I admit, I was intrigued by this idea of making breakfast overnight, but I kept putting off trying it.  I wondered, as I’m sure some of you have, what cold oatmeal would taste like? and what of those chia seeds? aren’t they the same seeds that you grow Chia Pets with? Well, after months of staring at it on Pinterest, I decided to give it a whirl.  I already had plenty of oatmeal (seriously, I buy it by the cartload from Costco), so the only thing I’d need to get were the Chia Seeds (which can also be found at Costco).  I used the recipe from The Yummy Life as a guideline and I was blown away by how delicious it was! I brought some into work and shared it with my coworkers and they loved it too! Over the past few weeks, I’ve made some tweaks to the original recipe and come up with a mixture that’s very filling, tasty and so satisfying! It is so delicious that I actually look forward to eating it and I’m always a little sad when it’s gone! This oatmeal has changed my life! Ok, maybe that’s exaggerating, but it has saved me at least 15 minutes in the mornings! That’s 15 minutes less time in a pre-caffeinated fog making oatmeal! Have I mentioned the time I grabbed the cumin instead of the nutmeg? Apparently chia seeds, (and yes, they are the same seeds that you used to grow “hair” on your Chia Pet) are very high in fiber and Omega-3 fatty acids. When soaked in liquid, they expand and create an almost pudding-like texture to the oatmeal. My recipe is nice and thick and it eats like a meal and because it’s eaten cold, it’s perfect for the warmer months!

I offer this recipe as a guideline.  Because we normally use almond milk as a dairy milk alternative, I have used it in this recipe.  You can certainly use dairy milk, but you may need to adjust the sweetener to your taste as almond milk tends to have a little sweetness already.  I also use plain yogurt because I like to be in charge of the amount of sugar I use.  You could use vanilla yogurt instead and again, adjust for sweetness.  You can use whatever fruit you prefer.  My current favorite is a frozen triple berry blend (blueberries, blackberries and raspberries).  Using frozen fruit is so convenient, but you can use fresh fruit as well!

Triple Berry Overnight Refrigerator Oatmeal

  • Servings: 1
  • Difficulty: easy
  • Print

Source:  Inspired by and Adapted from The Yummy Life

  • 1/2 cup rolled oats
  • 1 Tablespoon Chia seeds
  • 1 Tablespoon unsweetened coconut flakes (optional of course)
  • 1/3 cup lowfat yogurt (I personally prefer Stonyfield Organic)
  • 1/4 teaspoon vanilla bean paste or vanilla extract
  • 1-2 teaspoons agave syrup
  • 1/2 cup frozen mixed berries
  • 1/2 cup almond milk

Place all ingredients in a 16 ounce mason jar or other resealable container. Shake the contents until thoroughly mixed and place in the refrigerator overnight.

refrigeratoroatmeal-2


Cucumber Basil Gin Martini

Last weekend, we had to make an emergency run to the liquor store to replenish our gin stash! I can’t believe we actually allowed ourselves to run out completely and I have to admit, I was a little panicked about it! Off we went to the store with the intent to replace our old standbys–Hayman’s Old Tom Gin, Hendricks and Plymouth; but, what we left with was a new discovery: Citadelle Gin. Citadelle is a French Gin and like my favorite Hendrick’s, it is both floral and herbal and very smooth!

cucumberbasilmartini-4

The inspiration for this drink came from a sake-based cucumber-basil martini that I enjoyed just recently at a sushi restaurant. I didn’t have any sake at home, but I knew that the flavors would be perfect with the botanical notes in the Citadelle gin!  The weather is getting warmer, so you must put this drink in your spring and summer cocktail arsenal!  It is light, refreshing, herbaceous and so delicious! Perfect for a garden party!

cucumberbasilmartini-2

Cucumber-Basil Gin Martini

  • Servings: 2
  • Difficulty: easy
  • Print

  • 4 ounces gin – I used Citadelle but Hendricks or your favorite herbal gin will work
  • 2 ounces freshly squeezed meyer lemon juice
  • 1 ounce simple syrup
  • fresh cucumber slices
  • 2 sprigs basil
  • lemon rind for garnish

Muddle 3 thick slices of cucumber and the basil in a cocktail shaker. Add the simple syrup, lemon juice and gin and fill the shaker with ice. Shake and strain into a chilled martini or coupe glass. Garnish with a lemon twist and a fresh basil leaf.


cucumberbasilmartini


Happy Weekend!

“Dark and Stormy Cocktail” and taking time to “Look at the Flowers”

Last week, I had a terrible, horrible, no good, very bad week.

I won’t elaborate on the details in order to protect the innocent, but trust me, it sucked.  The husband was out of town for the week on a business trip and as luck would have it, everything that could go wrong did go wrong.  The icing on the cake was the morning (3:50 last Thursday, to be exact) I was trying to catch a few precious moments of sleep, when I heard the distant, plaintive chirp of the smoke alarm.  Have you ever noticed that smoke alarm batteries only die in the wee hours of the morning? Of course, the dying smoke alarm was located on the highest ceiling of the house, which meant that I had to go out to the garage in my pajamas and get the Giant Ladder.  Normally, I never even touch the Giant Ladder–the shiny, clean 5-footer is more my speed, but there I was, in my robe and slippers, precariously perched about 15 feet off the ground changing that dang battery. I’ve been told that it’s a great idea to change all the batteries at the same time.  But, think about that for a minute…can you imagine ALL of them dying and chirping at 2:00 a.m.?  Somehow I think it would be better to deal with them one by one.

After my sucky week, I retreated to my happy place (my back yard) and had a drink.

darkandstormy-10

This drink is so easy that it shouldn’t even be considered a recipe!  One part ginger beer, one part black rum, a generous squeeze of lime and a mint sprig and you’ve got yourself a Dark and Stormy.  It was just the thing to transport me out of my terrible, horrible, no good, very bad week and into a much calmer place.  The first time I had this drink was on a pub crawl a couple of months ago and it has become one of my new favorites! I used Trader Joe’s Triple Ginger Beer for this drink, but I actually prefer the taste of Reed’s Extra Ginger Brew.

Dark and Stormy Cocktail

Dark and Stormy Cocktail

Dark and Stormy

  • Servings: 1
  • Difficulty: easy
  • Print

  • 3 ounces Black Spiced Rum
  • 3 ounces (or more to taste) Ginger Beer
  • 1 lime wedge
  • 1 mint sprig

Fill a Collins glass (or a tall slender glass) with ice and add the rum. Fill the remainder of the glass with the Ginger Beer and finish with a generous squeeze of lime. Take the mint sprig in the palm of your hand and give it a quick smack to release the mint fragrance and add the sprig to the glass. Sit back, relax and dream of warm, Caribbean breezes.

darkandstormy

On a positive note, the weather has been absolutely beautiful lately. Everything is blooming or is about to bloom and the whole back yard smells of sweet citrus blossoms! We have two small lemon trees in the backyard that are in full bloom–one is a Meyer lemon and the other is a Eureka.  We also have a Mexican (Key) Lime tree, a very small Moro Blood Orange tree, and a Calamondin Orange tree.  For a while there, I was calling this part of our yard The Grove, but the show “Walking Dead” has kind of messed that up for me now.  I won’t spoil anything, just in case some of you aren’t caught up with it yet, but let’s “look at the flowers”, shall we?

Meyer Lemon Blossoms

Meyer Lemon Blossoms

The Calamondin Orange is also called a Calamansi Lime–which seems kind of silly–is it an orange or a lime?  The fruits are tiny–smaller than a kumquat and they are SO bitter!  Like little balls of acid! I still haven’t figured out a use for them, so if you have a recipe or an idea for me, let me know in the comments!  Otherwise, they do look pretty and smell wonderful!

Calamondin Orange Blossoms (also called Calamansi Lime)

Calamondin Orange Tree getting ready to bloom (also called Calamansi Lime)

We had such a mild winter that the petunias I planted last spring are still alive and are in full bloom!  Usually, they die out during the winter and I have to pull them out and replant!  I don’t know about you, but I’m feeling calmer already!

Petunias that were planted last year

Petunias that were planted last spring

As you know, we live in Southern Nevada where we have very dry air and brutally hot summers.  We are always looking for better ways to irrigate our many containers that aren’t connected to the automatic irrigation.  The husband ordered these neat little vessels called Ollas from Growing Awareness Urban Farm.  I think they are going to make container gardening a lot easier!  Ollas are unglazed terra cotta pots that you bury in the ground or in a container and fill with water.  This ancient method of irrigation works by allowing the water to slowly leech into the soil from the ollas, directly irrigating the roots of the plants!  There is no run off and little evaporation, so no water is wasted!  In addition, the leaves of the plants don’t get wet, so there is less chance of leaf mold or disease.

Ollas

Ollas

It’s definitely easiest to bury the olla before you start to plant, but we “retrofitted” these basil plants with a small olla.  So far, they seem to be happy!

darkandstormy-4

Basil Plants with Olla

This week is already shaping up to be a lot better than last week! Thinking calming thoughts!

darkandstormy-12


Arugula and Golden Beet Salad with Grapefruit Vinaigrette

When I was a kid, beets were the one vegetable that I would not touch with a ten-foot pole! It was the 1970s and the only beets we had came in a can and I thought they were awful! But the moment I had fresh, roasted beets served with goat cheese, I was hooked. Now I can’t get enough of them!

goldenbeetsalad-2

Earthy, sweet, gnarly-beautiful beets are made even sweeter by slowly roasting them in the oven with cinnamon sticks and bay leaves and marinated in a gingery-grapefruit vinaigrette.  If ever there was a salad that makes you feel warm inside, then this is it!   The weather is finally starting to warm up a bit, but it’s technically winter, so we can still take advantage of ripe, winter citrus, leafy greens and root vegetables.  This salad beautifully bridges the gap between the long, cold winter and the warm sun of spring that’s just waiting around the corner!

goldenbeetsalad-4

Golden beets are not always available, so when I see them at the market, I grab them.  Milder than red beets, they are sweet, less messy and they make a beautiful presentation on a plate!  Roasting them in the oven with cinnamon sticks and bay leaves has the added advantage of making the house smell so good!  I like to roast the beets ahead of time so that they have enough time to cool before slicing. When I made these beets for a salad to serve at our Thanksgiving dinner, I roasted them a few days ahead of time and refrigerated them.  They are very forgiving, just know that if you are roasting both red and golden beets at the same time, store them separately to keep the red ones from staining the golden beets. If you are lucky enough to find beets that still have their leafy tops, add the beet greens to the salad as well.  Beet greens are delicious and so healthy!

goldenbeetsalad-3

Arugula and Golden Beet Salad with Grapefruit Vinaigrette

  • Servings: 4
  • Difficulty: easy
  • Print

Preheat the oven to 375 degrees

For the Beets:

  • 3-4 medium sized golden beets
  • 2 bay leaves
  • 1 cinnamon stick
  • 1/2 cup water

Place the beets, bay leaves and the cinnamon stick and water in a small oven-proof casserole dish. Prick the beets all over with a fork. Cover the pan tightly with foil and roast in the oven for 1 hour or until the beets are tender. After the beets are cool enough to touch, peel them and slice semi-thin with a mandolin or a sharp knife.

For the Vinaigrette:

  • Juice of 1 whole ruby red grapefruit
  • 1 small shallot, minced
  • 1 teaspoon maple syrup
  • 1 1/2 teaspoon dijon mustard
  • 1 inch knob of ginger, grated
  • 1 teaspoon fresh thyme, minced
  • 1 tablespoon fresh parsley, chopped
  • 1 pinch salt
  • 1/2 teaspoon freshly ground pepper
  • 1/4 cup olive oil

In a small bowl, whisk together all of the ingredients except the oil. Allow the mixture to sit for about 10 minutes to allow the flavors to marry.
Add the olive oil and whisk until the mixture is emulsified. Pour half of the mixture over the beets and marinate for about 20 minutes.

For the Salad:

  • 5 ounces arugula, wild rocket, or your preferred mixed greens
  • 1/8 cup raw pine nuts
  • 1/4 cup pomegranate arils (optional, but so pretty!)
  • Goat Cheese, crumbled
  • 1 ruby red grapefruit, sectioned
  1. Lightly toast the pine nuts in a dry frying pan for 3-4 minutes or until the pine nuts turn golden brown. Pine nuts can go from toasted to burnt really quickly, so whatever you do, don’t walk away from that pan! They burn so easily and the smell is worse than burnt popcorn in the company break room! This is speaking from experience! Remove the pine nuts from the heat and set aside.
  2. Section the grapefruit by removing the peel and the white pith with a very sharp knife. Working over the bowl of sliced beets, hold the grapefruit in one hand and with the knife in your other hand, cut alongside the membrane of each section allowing the sections to fall into bowl. Gently fold the grapefruit into the beets.
  3. Lightly dress the arugula with the remainder of the dressing and toss with your hands (you don’t have to use it all–the recipe makes about 1 cup of dressing).
  4. Top the arugula with the beets and grapefruit, then sprinkle with the pine nuts, goat cheese and pomegranate arils.

goldenbeetsalad-6

goldenbeetsalad

goldenbeetsalad-11